Chainlink External Adapters, Sanity, ERC20 and stuff like that – Part 2: Building the Chainlink External Adapter


In the previous article, we discussed the extended applications of a setup like this one. We also completed the Sanity part of the project and from here on out it will be all Chainlink and smart contract. In case you felt the previous article was lacking in code, I hope you don’t complain this one is too filled with it XD. In this article we will: • Write our External Adapter to connect to Sanity • Run our Local Chainlink Node • Add our External Adapter to our Node
In our case we will define a Chainlink Job to parse multiple arguments instead of just parsing one (multi-variable output jobs). We won’t be calling it from a smart contract in this article. I have left that part for article 3 – a complete article on the smart contract. Here we go…
Writing the Adapter
It might come as a bit of a let down but Chainlink’s external adapters are at their core just NodeJs/Express servers with some custom logic. If you have any experience with backend development, this part will be a breeze for you. If you don’t, then fret not for we will take things easy. While we can write our external adapter completely from scratch, I prefer to use a template that Chainlink has made available for a while now. This is not the Mono Repo I mentioned in the previous article. Go to this link. The above link a bootstrapped Express Server which will save us a lot of time. Even if you were to make it from scratch, the main idea would be hosting a NodeJS server somewhere and then using it via exposing the REST API and putting that into the Chainlink Node.
Here we will use the above repo for time’s sake.
Clone the repo on your workstation and then go into the cloned project directory and open it in your favourite code editor. Run npm install to install all dependencies. Open the index.js file. By default, it should be pointing to a crypto currency price API. This is what is discussed in the Chainlink docs. You do NOT need to delete all of it. We will modify just the parts we need.
Run npm i ethers @sanity/client dotenv from the terminal inside the project. This will install Ethers.Js, Dotenv and Sanity Client. The last one will be needed by us to query the DB we made in the previous article. At this point, I am assuming you already have a view-only type API key for you Sanity’s DB.
I recommend using .env to pass it through environment variables and that’s where Dotenv comes in. If you don’t know how, just make a .env file in your project root and then paste your Project ID and API Key from Sanity. That should do it.
Go back to index.js. Here there should be a variable called customParams. We are going to always pass in any parameters we need via the Request Body using a POST request. Even the Chainlink Node makes a POST request because most of the times, there some fields which you want to extract and selectively receive in the smart contract. This variable is used for that purpose.
Except endpoint: false remove everything else in there and add wallet: [“wallet”, “walletAddr”, “addr”], before endpoint: false. What this basically tells is that we will look for an argument called “wallet” in the request sent to the adapter. However, instead of “wallet”, the argument may also be sent as “walletAddr” or “addr”. After this addition, customParams should like kind of like this:
const customParams = {
  walletAddr: ["wallet", "address", "walletAddress"],
  endpoint: false
}
The createRequest() method is where the request to the Sanity DB will be made via Sanity Client, processed and then sent back to the smart contract via the Chainlink Node. Our createRequest will look something like this:
const createRequest = (input, callback) => {
  // The Validator helps you validate the Chainlink request data
  const validator = new Validator(callback, input, customParams)
  const jobRunID = validator.validated.id;
  let walletAddr = validator.validated.data.walletAddr;
  walletAddr = utils.getAddress(walletAddr);

  const client = sanityClient({
    projectId: process.env.PROJECT_ID ,
    dataset: 'production',
    apiVersion: '2021-04-27',
    token: process.env.API_TOKEN,
    useCdn: false,
  });
  const query = `*[_type == "user" && walletAddress == $walletAddr] {isVerified, signupDate, walletAddress}`
  const params = {walletAddr};

  //id of the document to fetch
  client.fetch(query, params)
  .then((user) => {
    const {isVerified, signupDate, walletAddress} = user[0];
    const joined = Date.parse(signupDate+"T00:00:00")/1000;
    const qualified = Date.now()/1000 - joined > 20 * 24 * 60 * 60;
    const response = { data: { isVerified, qualified, walletAddress } };
    callback(200, Requester.success(jobRunID, response))

  })
  .catch(error => {
    callback(500, Requester.errored(jobRunID, error))
  })
}
After extracting the jobRunID we are extracting the wallet parameter containing the invoker’s wallet address.
Please note the inside smart contract, invoker’s wallet address would be obtained by msg.sender. We will need to convert it to string before sending. The trick to that will be seen in the contract in the next article. However, in this conversion we will lose the Checksum validity of the wallet address. The utils.getAddress() method from ethers comes in here to give us the proper formatted address. We will be using this to query the Sanity DB.
Next, we initialize our Sanity Client. We pass in our project ID (via environment variable), dataset (which will be production in your case as well unless you have customized it), API version (make it the current date), API Key (via environment key). The useCdn is an optional flag in case you might want to build a backend n’ frontend for your Sanity DB.
The query and params are what we will pass to the sanity client while querying. The former is a GraphQL based query (called GROQ). Really convenient and intuitive to use. While the latter is the parameters we are using inside it. Since the walletAddress to search for will vary in every request, we put it inside the params constant as a property and then refer the corresponding key inside the GROQ query. Within the curly braces we pass in the fields we want to get back.
Next, we pass this query along with the parameters to fetch the documents matching the specified criteria. It’s an asynchronous process and we use Promise based structure to get back the response and format it. I chose not to return the date in raw format and instead made a Boolean flag qualified out of it which evaluates to true if 20 days have passed since the date of signing up.
Notice that the response constant which would send back has a specific format – all the fields we wish to send back are inside the data field. This is not a choice. It’s mandatory. We will see how the Job we define in our Chainlink Node will refer to this data field.
Lastly, inside the callback() function we pass in the HTTP success code of 200 and a Requester.success() function which contains the jobRunId and the response. We pass in the code for HTTP server error along with the jobRunId and error inside Requester.errorred() if either the Promise gets rejected or we encounter any error in our code.
This concludes the external adapter. If you look further in the index.js file you will discover that there are many utility handlers defined for scenarios like hosting the adapter on GCP Cloud Function or AWS Lambda. I have never tried hosting it on Heroku but I guess that can be the topic of any future article. As I mentioned before, this external adapter is an Express Server which will run like a Webhook if you host it on any of the cloud platforms. We will just run it locally. Running npm start or npm run start starts the server on default port of 8080.
Running our local Chainlink Node
While I would love to walk through the steps of how to run a Chainlink Node locally, it would make this article really long. Which is why I would defer to someone with much better expertise than me. Go through the video below streamed during Chainlink Hackathon 2022 which gives a complete demo of how to run Chainlink Node along with Postgres SQL instance on Docker containers. If you didn’t know, Chainlink uses Postgres SQL under the hood.
{% embed youtube.com/watch?v=DO3O6ZUtwbs %}
The Code along video above deploys a Postgres SQL docker container first using the credential specified in the environment files and then a Chainlink Node in a docker container on top of it. The Node can be accessed at localhost:6688. You should already have the creds to sign in if you watched the above video.
Adding External Adapter to the Chainlink Node
Chainlink does things through “JOBS”. Jobs are run on the node whenever a request is placed by a smart contract though an Oracle (you should have deployed an Oracle Contract by now as shown in the Video). You can actually follow everything in the video above and you would have a Job composed of core adapters provided by Chainlink. In fact, I would recommend you follow the code along because that would give you experience in defining a Job.
External Adapters are needed when you are in need of custom logic to be executed. The most common use case of this is when you need authenticated access or the stuff you need is behind a firewall. Here we are making authenticated access to Sanity’s DB. The basic flow is to create a bridge which would refer to the webhook/webserver URL of the External adapter server (note that it should already be running or hosted). And then creating a Job to pass things onto the external adapter through that bridge.
If you are familiar with pointer arithmetic in C, think of the external adapter server as data stored on Heap, the bridge as a pointer to that data and the Job as a method or routine that accesses that data via the pointer.
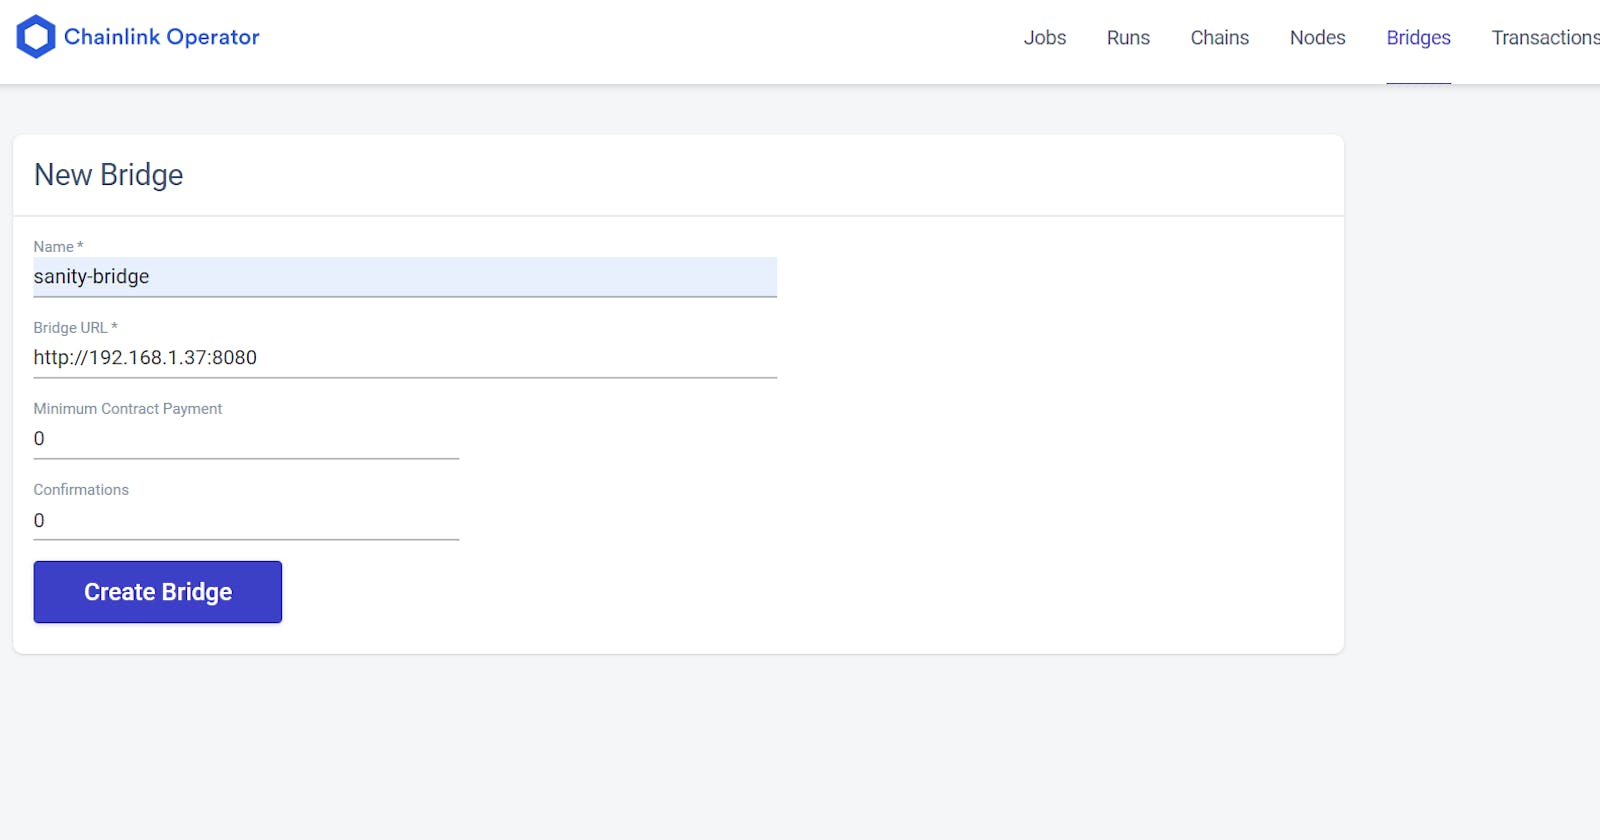
Creating a Bridge
To create a Bridge, sign into your Chainlink node by going to localhost:6688 and entering the credentials you had defined while setting up the Chainlink Node’s environment. Then go to the Bridges tab as shown below.
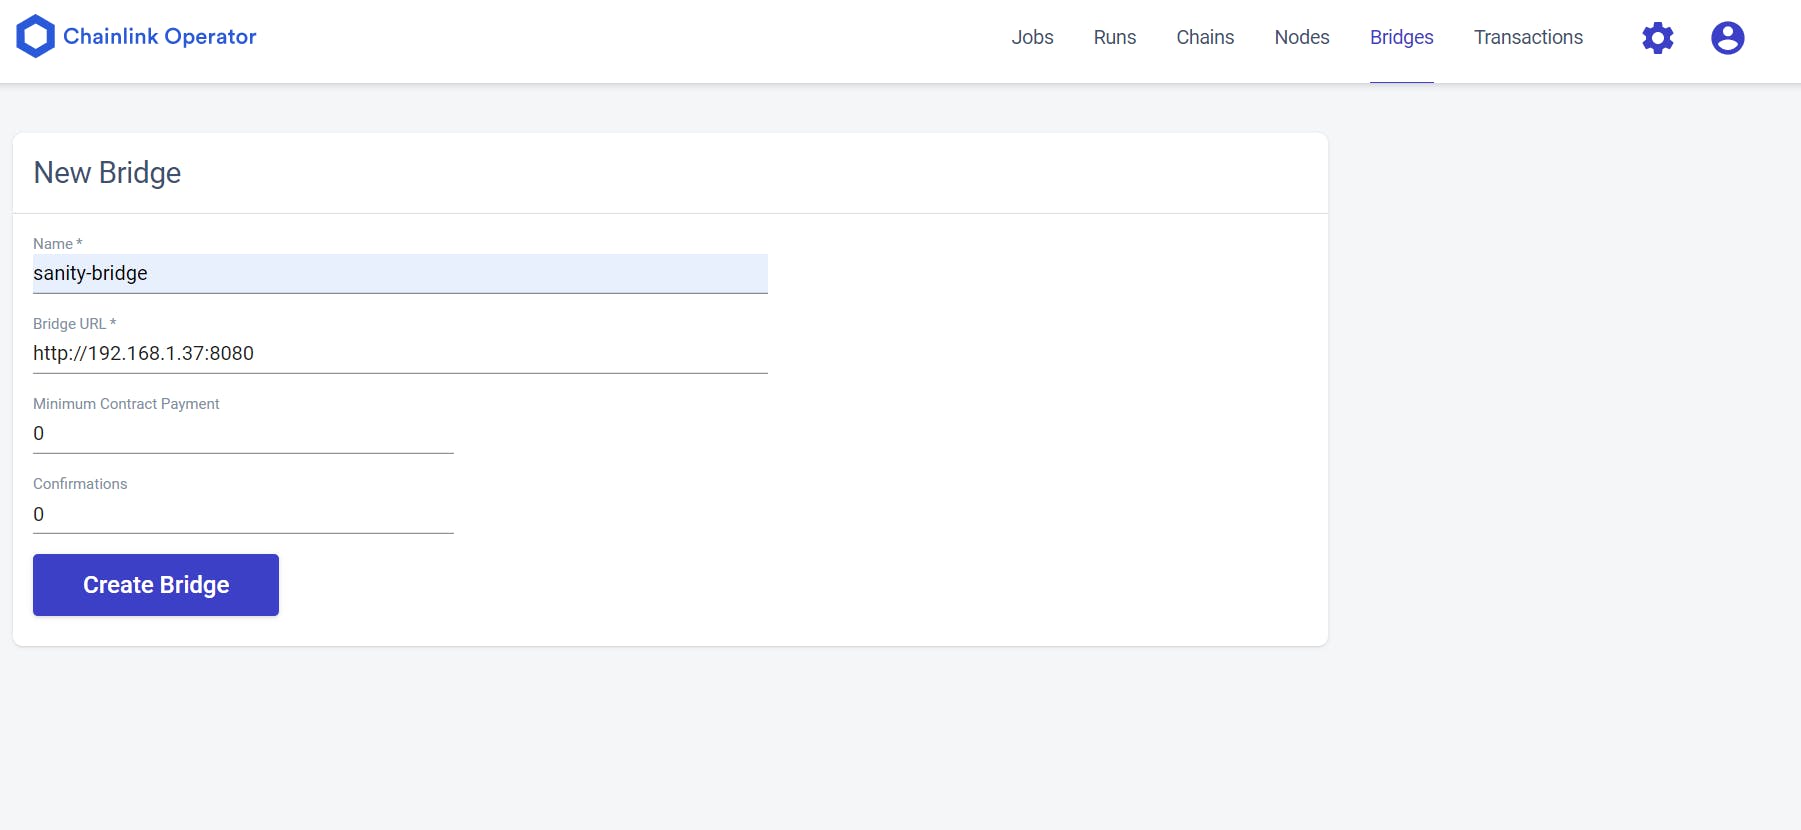
Here, I am naming the bridge sanity-bridge. The link to the bridge will be the link to the hosted server. If you are hosting yours on GCP Cloud Functions or AWS Lambda, paste the webhook link you received. If you are running it locally like I am then http://localhost:8080 does the job.
In the above pic I have defined it using a private IP because localhost is resolved to 127.0.0.1 by the Chainlink Node which is not my localhost IP address. This resulted in the connected getting refused in my case. If you are facing such a problem where Chainlink Job’s access to localhost gets connection refused error, you can replace that by your localhost IP like I have done here.
Clicking on Create Bridge completes this step. Next, we will make a Job that will refer to this Bridge.
Creating a Job from the Bridge
Click on Jobs and then click on New Job. You will come across a page where it will show an editor where you need to define the job via a TOML. Earlier it used to be JSON (and you will still find examples of it in market.link). The below TOML specification below is for our Job.
type = "directrequest"
schemaVersion = 1
name = "(Get > x2 Bool)"
maxTaskDuration = "0s"
contractAddress = "0xf8b64a4273F13C2521ACC715d3022b8Bd31e1bE8"
minContractPaymentLinkJuels = 0
minIncomingConfirmations = 0
observationSource = """
    decode_log   [type="ethabidecodelog"
                  abi="OracleRequest(bytes32 indexed specId, address requester, bytes32 requestId, uint256 payment, address callbackAddr, bytes4 callbackFunctionId, uint256 cancelExpiration, uint256 dataVersion, bytes data)"
                  data="$(jobRun.logData)"
                  topics="$(jobRun.logTopics)"]

    decode_cbor     [type="cborparse" data="$(decode_log.data)"]
    fetch           [type="bridge" name="sanity-bridge" requestData="{\\"id\\": $(jobSpec.externalJobID), \\"data\\": { \\"wallet\\": $(decode_cbor.wallet)}}"]
    parseVerified     [type="jsonparse" path="data,isVerified" data="$(fetch)"]
    parseQualified     [type="jsonparse" path="data,qualified" data="$(fetch)"]
    parseWallet     [type="jsonparse" path="data,walletAddress" data="$(fetch)"]
    encode_data     [type="ethabiencode" abi="(bytes32 requestId, address walletAddress, bool isVerified, bool qualified)" data="{ \\"requestId\\": $(decode_log.requestId), \\"isVerified\\": $(parseVerified), \\"qualified\\": $(parseQualified), \\"walletAddress\\": $(parseWallet)}"]
    encode_tx       [type="ethabiencode"
                      abi="fulfillOracleRequest(bytes32 requestId, uint256 payment, address callbackAddress, bytes4 callbackFunctionId, uint256 expiration, bytes calldata data)"
                      data="{\\"requestId\\": $(decode_log.requestId), \\"payment\\": $(decode_log.payment), \\"callbackAddress\\": $(decode_log.callbackAddr), \\"callbackFunctionId\\": $(decode_log.callbackFunctionId), \\"expiration\\": $(decode_log.cancelExpiration), \\"data\\": $(encode_data)}"
                    ]
    submit_tx    [type="ethtx" to="0xf8b64a4273F13C2521ACC715d3022b8Bd31e1bE8" data="$(encode_tx)"]

    decode_log -> decode_cbor -> fetch -> parseVerified -> parseQualified -> parseWallet -> encode_data -> encode_tx -> submit_tx
"""
At first glance, the TOML specification might seem overwhelming but once you start to read through it. The below is the walkthrough:
typedefines the types of requests to handle. It can bewebhookor in our casedirectrequest. This means the smart contract would directly request the Job to run via the Job’s external job Id.- While you can skip over
schemaVersionfor now,namefield is fairly intuitive.maxTaskDurationis the time allotted to it for completion. contractAddressis NOT the contract address which places the request. It’s the Oracle Contract address. Remember the video above deploys one so you should already have one.minContractPaymentLinkJuelsdefines the amount of LINK tokens required to run the Job. Generally, if you are going to deploy it on mainnet, I would recommend you to not keep it 0 as we have here. This will prevent spamming of the Job because the smart contract and thus, the user would have to pay in real LINK tokens.minIncomingConfirmationsis the confirmations needed for this Job’s transaction.observationSourceis the crux of the Job. This is where we define the tasks that the job needs to perform. First, we define the tasks and then at the very end we define the order in which those tasks need to execute. Here we have: a.decode_logtask decodes the data sent from the smart contract to the Chainlink Node. It does so from an event which here is named asOracleRequest. The log data from the event is taken as the data passed to the Job. b.decode_cbor– CBOR is a data representation format kind of like how JSON is. Note here how the previous task is referred here along with the task’s parameter bydecode_log.datain this task. Basically, it will parse the data for further use. c.fetch– Herefetchis a task of typebridge. This task refers to the bridge we defined earlier. Tasks of typebridgeneed to pass in the name of the bridge in thenameparameter along with the data to send to that bridge in therequestDataparameter like we have done here. d.parseVerified,parseQualifiedandparseWalletparse the JSON response that the Job receives from the external adapter via the bridge in-between. These then take out particular properties from that JSON as specified in thepathparameter. The JSON data to this task is passed from thefetchtask earlier. e.encode_datatask is where the part to return data back to the smart contract begins. Here, notice theabiparameter. This parameter’s value should coincide with the parameter list of the fulfillment function (the function whose selected is passed to the Chainlink request from the contract and is executed after the Job concludes). Thedataparameter contains the data that the smart contract will receive. Notice how the fields bear the same name as that of the parameterabi’s value and they refer to the result from the previous tasks ofparseVerified,parseQualifiedandparseWalletby the respective tasks’ name. Thus, our Chainlink Job is Multi-Variable Output Job. Meaning there would be more than one output of this Job and they will vary per request. f.encode_txinvokes a function on the Oracle Contract containing the same name and function parameter as the value of the task parameterabi. g. Lastly,submit_txsubmits the transaction to the address specified in the “to” parameter. This needs to be the address of the oracle contract. h. Below that you should notice that there is a sequence specified separated by->. You guess it right! This is the sequence we define in which the tasks would be executed in the Job.
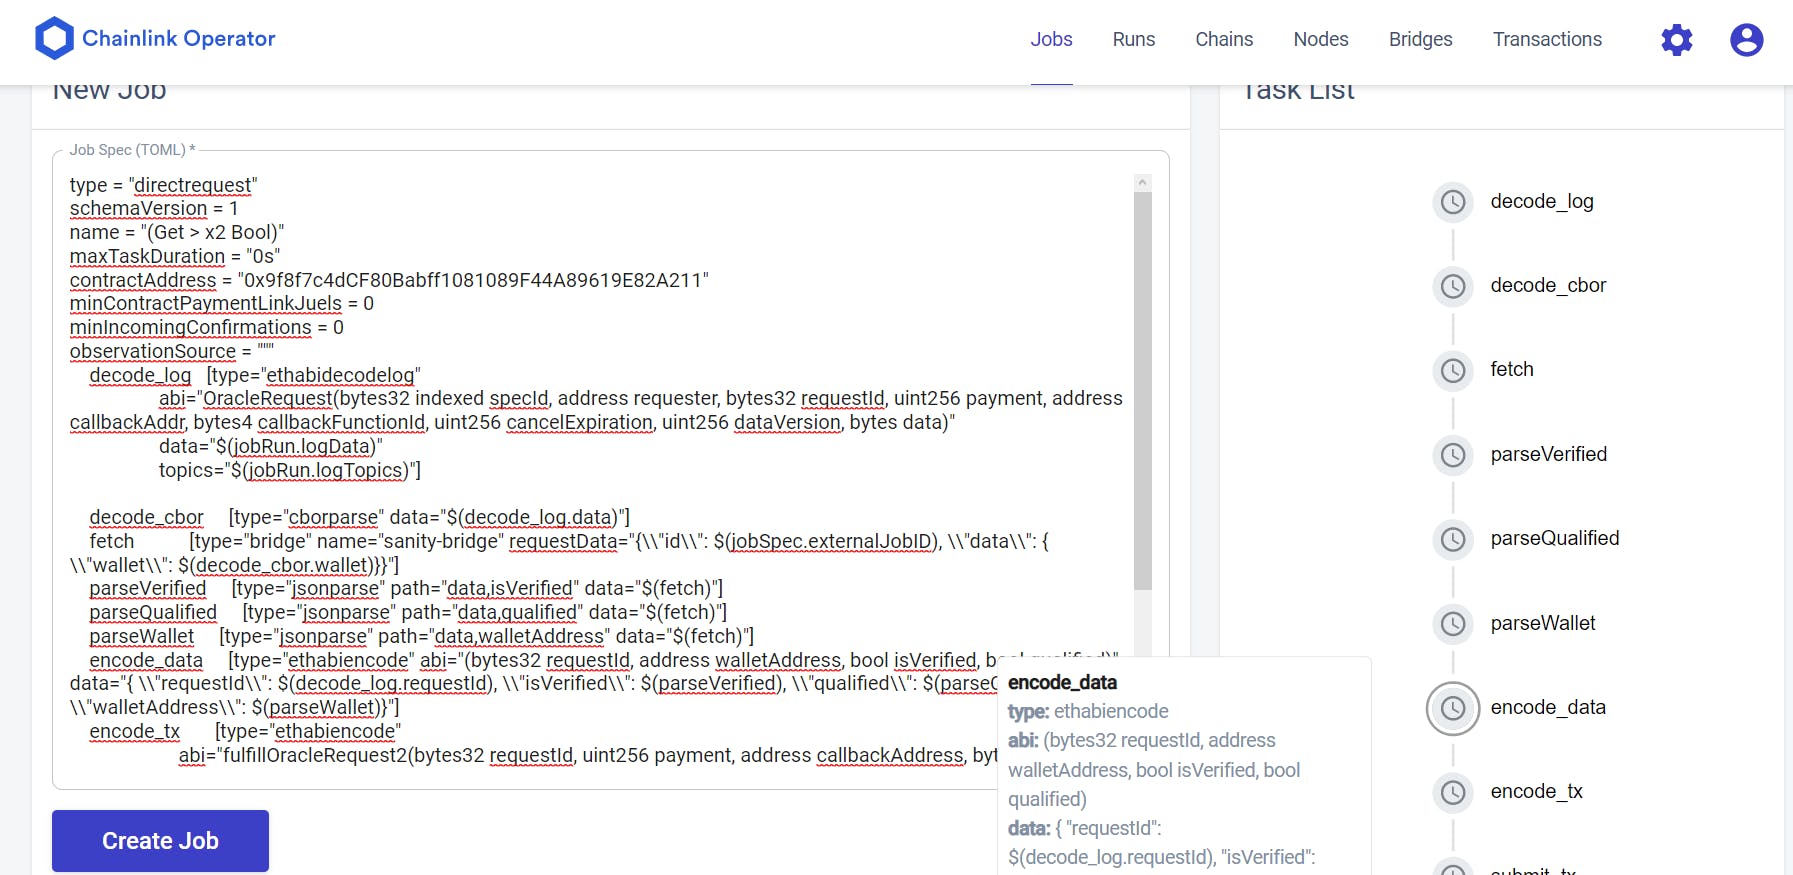
If you refer to the image above you would notice at the right there is a panel showing the same sequence top to bottom as we have specified in the Job TOML specification’s last section. That further provides a visual verification that the tasks will execute as you intend them to. Hovering over any task on that panel will show you its details.
Clicking on Create Job creates the Job. This will give you an external Job ID for the Job which we will use in our smart contract in the next article. Now here are a few pointers before you continue onto the next article :-
• The Chainlink Local Node should be funded with ETH and LINK tokens. This can be done by clicking on Chainlink Operator icon. It will show you something like the screen below. Send some ETH and LINK (both tokens on the testnet, I will not be responsible if you send actual mainnet ETH and LINK to the address and then lose them). You can get some Testnet ETH and LINK from the Chainlink Faucet.
• You need to execute setFulfillmentPermission() on your oracle contract. Pass in this local Chainlink Node’s address in the _node field and _allowed field as true. Once this transaction is confirmed, the Oracle Contract will allow our Chainlink Node to send requests to it. It’s a safeguard against spamming.
• If you are taking a break after this article by running docker compose down and closing the whole setup, you will need to define the Job and Bridge again. You will get a new Chainlink Node Address and you will need to fund that address and set permission from your oracle contract for that contract all over again.
That’s all for this one, folks!
After this, all that’s left is to develop the smart contract which we will do in the next article in the series. Frankly, I feel like there has been enough for one article and that’s a lot of information for a first timer to process.
Before I close off this article, I would recommend you to join the Chainlink Discord. There are many good people and resources there. Plus, you would get news about all hackathons in which Chainlink takes part.
I would also like to give a shout out to Matt from Block-Farms.io who helped me on this one. Block Farms offers Node Operators where you can host your Chainlink Jobs like these at an attractive rate so you might wanna check them out if you want to host your Jobs for you contracts.
On that note, thanks for reading this article. I hope you found it interesting and learned something from it. See you in the next part of this series!