

As a Fullstack dev, there are plenty of times when you’d be involved in the creation of the backend while also helping out in the frontend. As a Web3 dev, that’s especially true since most frontend developers might know of react-query, swr and axios but not of ethersjs and viem. So, it tends to become a habit of sorts to help on the front-end side.
Quite recently, our company has been considering NestJs as a candidate for the backend stack. Having used it before, it’s really a no-brainer as to why someone would not want to utilize NestJs. There are other alternatives but when compared to barebones, from-scratch development using Express, I would always prefer a framework like Nest. It helps focus the development strategies while staying true to the underlying library (be it fastify or express). In short, it helps avoid chaos.
In my recent series, I have explored the usage of NextJS. But those were particularly Web3-focused. All things considered, it seemed like a next step – to explore how to use NextJS with Next Auth and combine that with a NestJS backend.
So, what to build & what would be the objectives?
But as with every series, a mini-project is needed. Seeing how creating a “Kanban Board App” is all the rage right now amongst frontend devs on Youtube using DND Kit, I thought why not give it a try ourselves? So, we will create an end-to-end sort of project in this series – A personal Kanban Board with:
NestJS in the backend
NextJs in the frontend
Next Auth handling the authentication on the frontend
Supabase for Auth DB on both ends
NoSQL DB for the backend
The objectives here would be to answer the following questions through the mini-project:
How to use NextAuth with Next Js and a Custom Backend?
How to configure Next Auth’s Google Provider to work with a custom Backend?
How to manage Authentication and Authorization when using Next Auth with Google or a similar provider and a custom Backend?
Can the Access Token and ID tokens from Next Auth providers be utilized with NestJS?
How to manage authentication on REST with a GraphQL backend in NestJs?
Can multiple Prisma providers be used in a single NestJS backend? If so, then how?
We won’t be answering all the questions outright in this article. In fact, along the way, there might be more questions added to the list. Rest assured, these questions will be answered by the time we reach the end of the series.
In this article, we will focus on how to use Next Auth with NextJs and make it talk securely with the NestJs Backend. Things become easier if we use CredentialsProviders of Next-Auth. If used with a NestJs Backend, one needs to utilize the authorize() method. Once the user enters the credentials on the frontend, this callback is invoked. The authorize() callback will send the credentials to the NestJs backend’s API. The NestJS Backend Auth API will receive the credentials (username and password or something similar) and if the user exists will send back an access token (JWT) or something. Back in the authorize() callback, when the access token is received, that will be included in the User’s session in the Next Auth through the session callback. Simple as that.
Things become a bit complicated with Next and Next Auth if you take into account Providers like Google, Gitlab, Github, and so on. These providers send back access_token and other similar tokens to next auth and are tied tightly to work seamlessly with NextJs and optionally a DB. The USP of NextJS (being a Fullstack framework aiming to provide completeness out of the box) also becomes a burden on some Devs trying to customize things to suit the use case.
What many devs fail to realize is that Next Auth, through these providers, is supposed to provide Authentication (authN). The Authorization (authZ) part of management still rests with us. It Must be configured by us. Say if the Google Provider provides access_token and id_token, should these be used for authZ? No. One should create their own methods of authZ. This can range from simple second JWTs in the session to LDAP.
But where to insert this mechanism? How do we insert it so that it can also function with a custom backend? One cannot simply leave the backend open to all requests. AuthN and AuthZ are needed there as well.
With these questions in mind, let’s get started with this series.
Housekeeping
Before we jump right into coding, there are some steps we need to take. This tutorial assumes basic familiarity with NestJS and NextJS. Knowledge of next auth is a plus but not mandatory. We would also need to use Supabase and Prisma. So, the reader should be familiar with the basics there as well.
Setting up Supabase
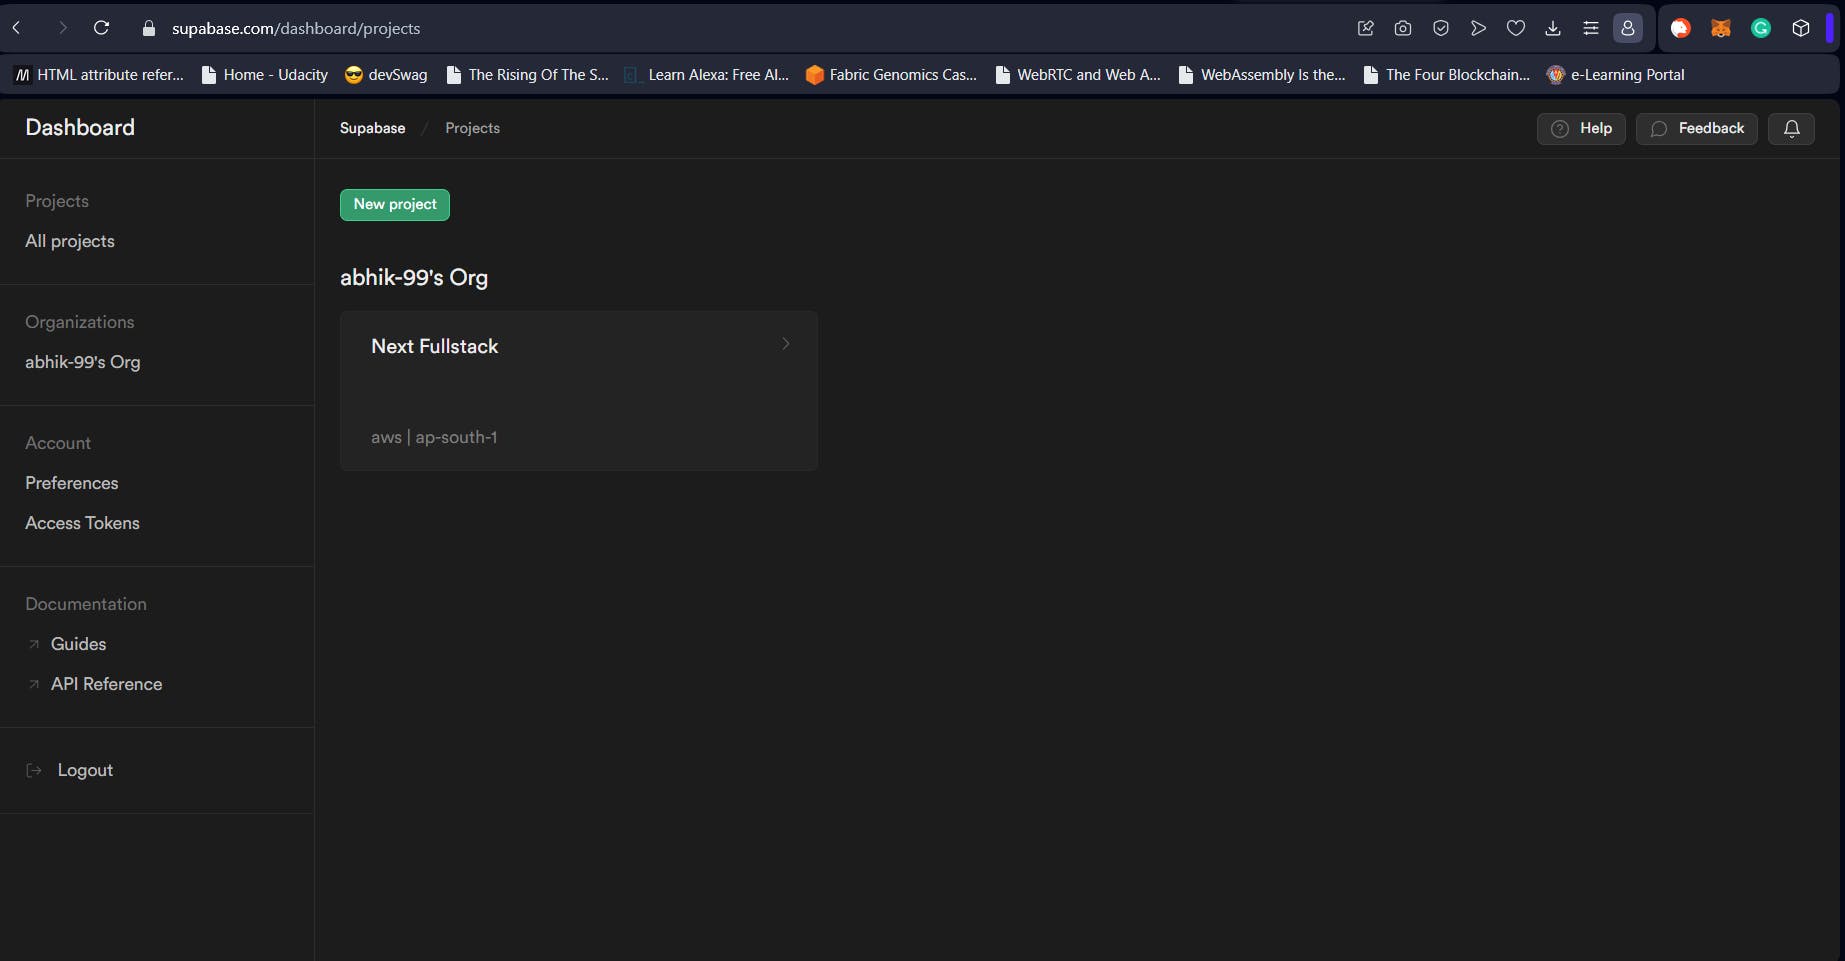
Just head over to supabase.com and sign up if you haven’t already. Create a new project under the organization of your choice. In my case, I have selected the default org (called abhik-99). The project I have created is called “Next Fullstack” as shown in the image below. The image below shows the Supabase Dashboard after creating the project.
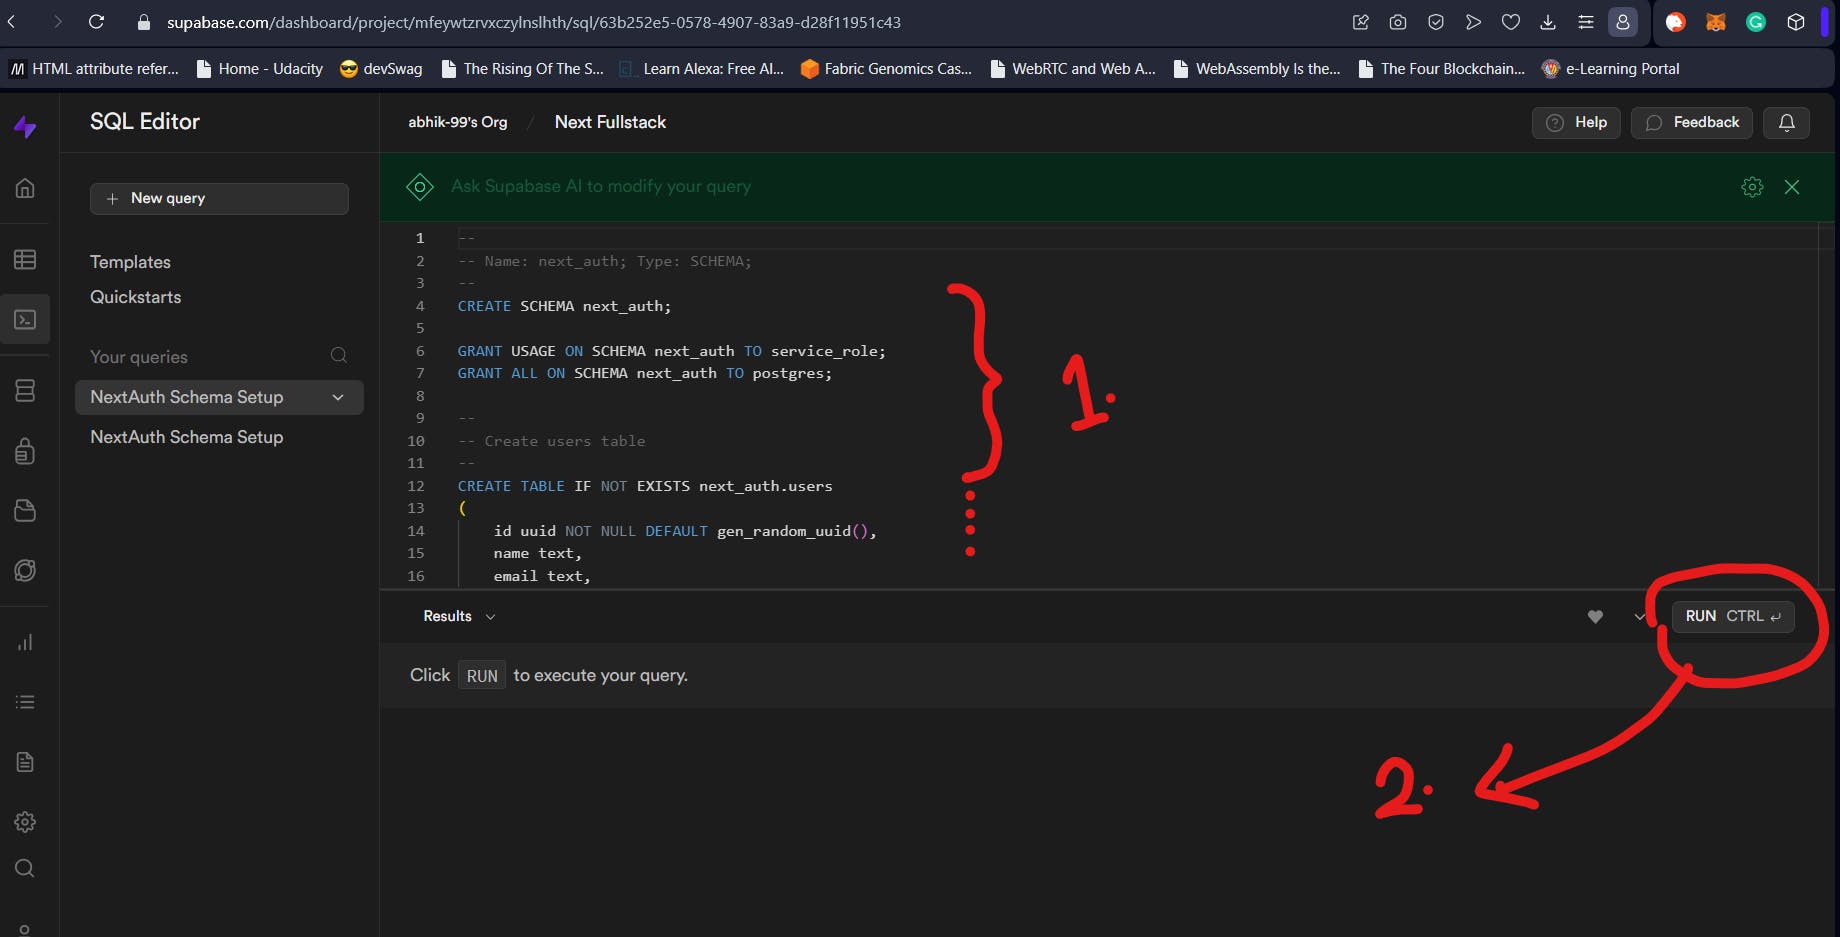
We will use the Next Auth quickstarts to get up and running fast. Click on your project, then click on the “SQL Editor” icon from the left panel (1.). Head over to “Quickstarts” as shown below (2.). After that click on “Next Auth Schema Setup” option as marked below (3.).

As shown in the image below, this will open the SQL Editor with the Statements to run (1.). Click on Run to execute those SQL statements (2.). Supabase will run those and create your tables for you. The schema name would be next_auth.
You might be tempted to think that this is it. But this is just half the process. Our schema is created. But by default, it is created as a private schema. So, while we can manipulate it from Supabase Dashboard, we will not be able to connect to the Supabase instance and query it. To make sure that the schema we created can be accessed using something like Prisma, we need to make it public. To make sure that queries can be run, we need to tell Supabase to insert a search_path for the schema. These two are separate steps which we will cover next.
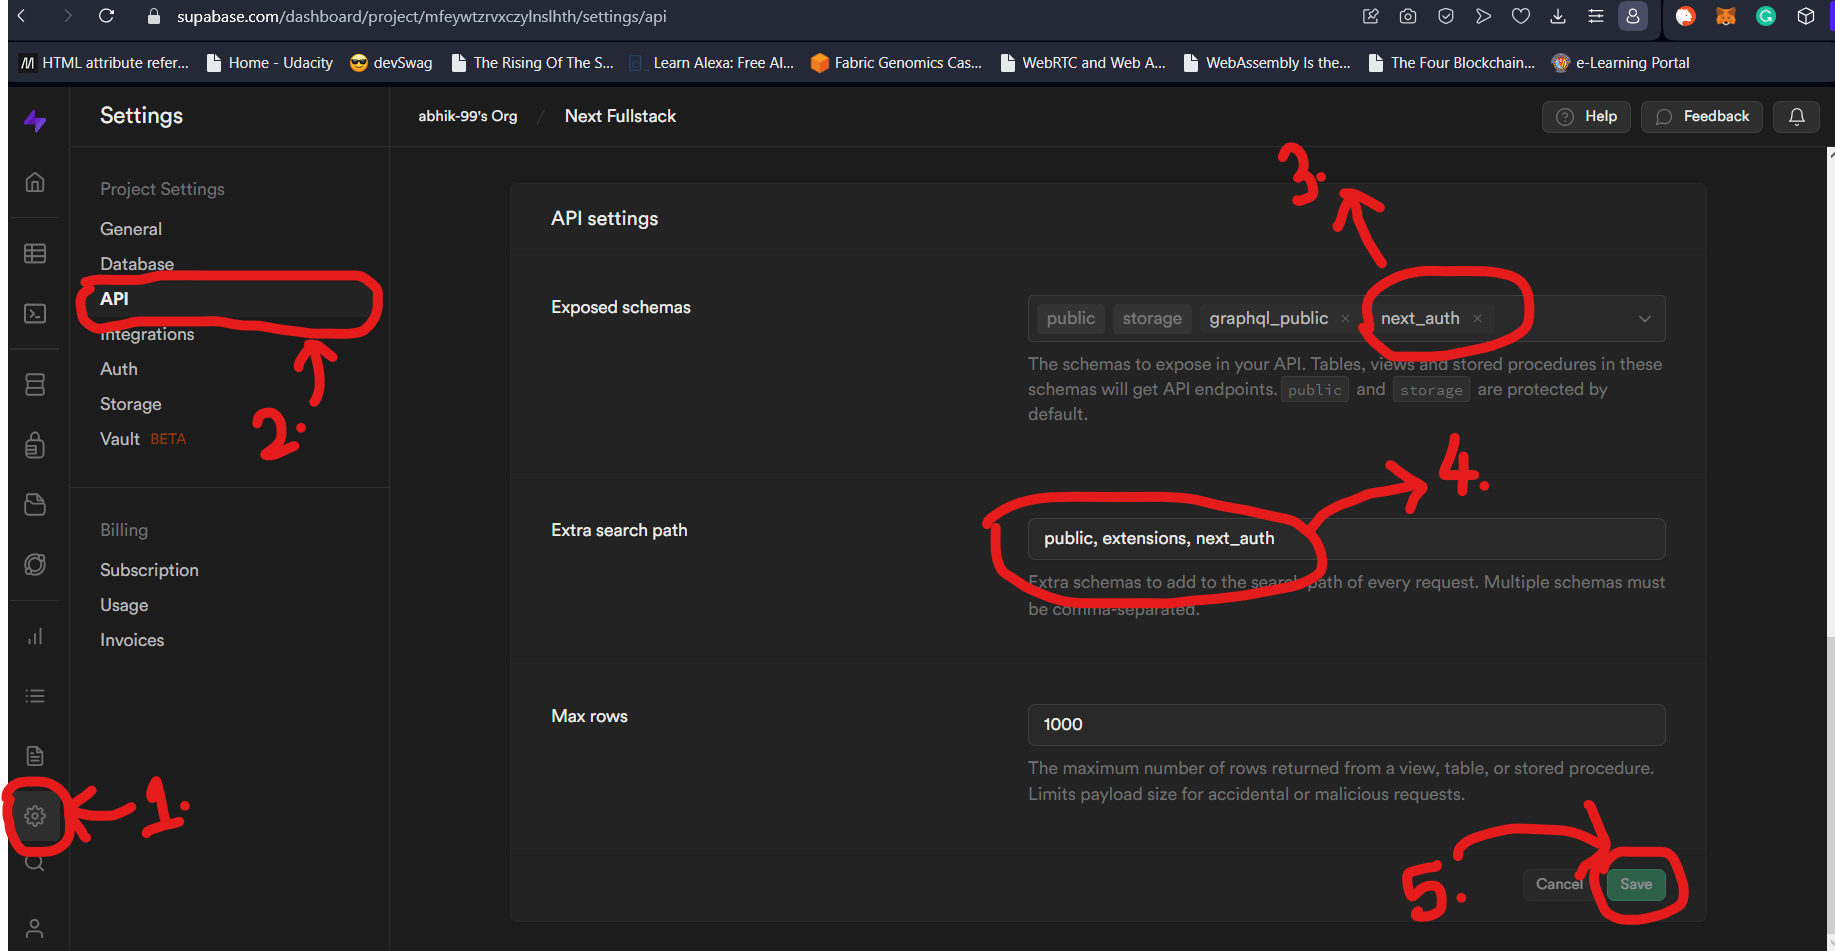
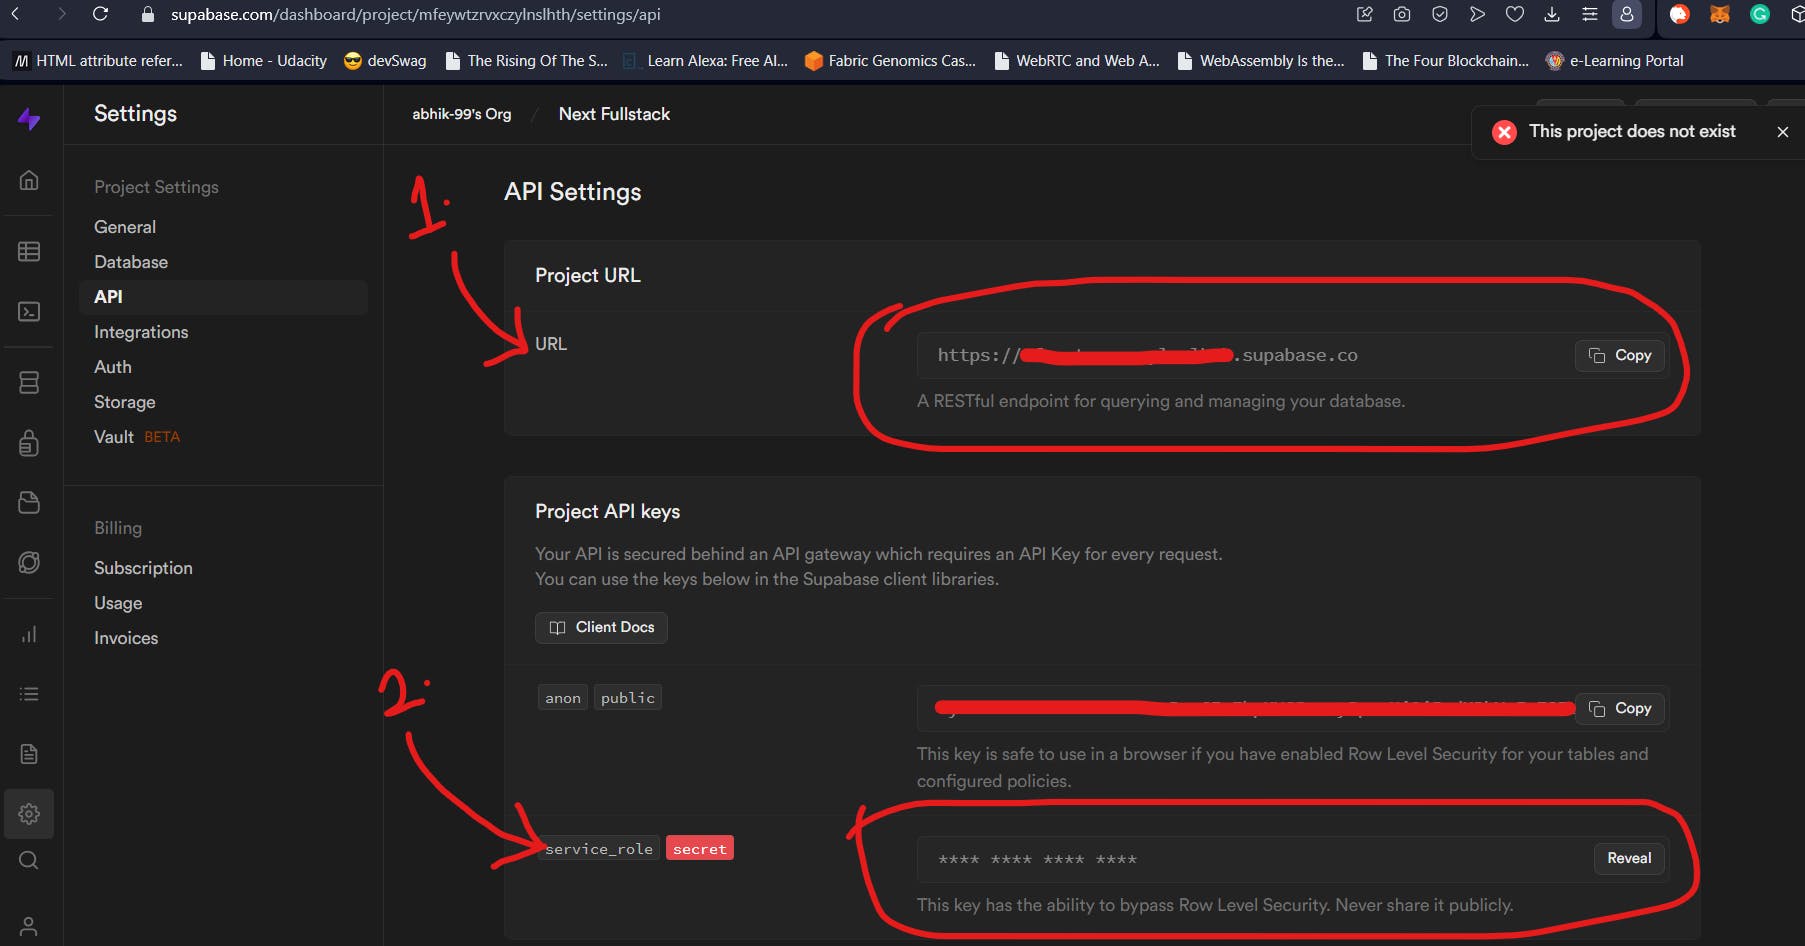
As shown in the image above, to make our custom Supabase Schema accessible and queryable, we need to go to Settings (1.). After this, click on API (2.). This option will show you the essentials like the Service role key, anon key, and more. Scroll down to the API Settings. Here, we need to add our custom schema which in our case is next_auth (3.). This needs to be followed up with adding the same schema to the Extra Search Path option (4.). Click on Save to make sure these changes take effect.
This completes our Supabase setup. Next, we will move to setting up our NextJs and NestJs projects inside a mono repo.
Setting up the NextxNest Project
Typically, one would first initialize the monorepo first and then add the required projects. But we won’t follow the general script of steps here.

We will first set up our sub-projects and then create a monorepo out of it all. This roundabout way of doing things will help answer the question “How do we create a Monorepo from an existing project?”. We will use Turborepo to handle the monorepo part of things and use NPM as the package manager.
Initializing NextJS
Setting up NextJs is really simple. All you need to run is npx create-next-app@latest. This will install create-next-app if you don’t have it already and then direct you through a series of questions. In our case, albeit the project name, everything else will be set to the default setting.
We will call our NextJS 13 project “frontend”. Following the prompts from the script, you should have a folder called frontend. This will be where we create (unsurprisingly) the frontend for our Kanban project. Integrating Next Auth and Supabase into NextJS will be covered in the later sections.
Initializing NestJS
The more convenient way of using NestJs is to install the NestJS CLI globally and use it again and again to create new projects, controllers, sub-apps, and microservices. Running npm I -g @nestjs/cli will do precisely that for you.
Assuming you have already done that, move to the parent folder of frontend and run nest new backend. If you get an error that the nest script cannot be found or something even after installing Nest CLI, try running npx nest new backend to see if it works.
This will create a Nest project called backend at the same level as our Next project called frontend. Make sure to remove the node_modules folders from both. Furthermore, move to the package.json inside backend NestJS project and rename the script start:dev to just dev. This will match the NestJs dev script with the dev script name in the NextJS project.
Additionally, find the main.ts file of your Nest project and change the PORT from the default 3000 to 3001. This will prevent a port collision between the NextJS project and our backend.
Creating a Monorepo
Lastly, we will create a Turborepo monorepo out of an already existing project. In the folder containing backend and frontend, run npm init. This will create the package.json we need. Once you have the, we need to add turbo dependencies and the scripts along with denoting the workspaces.
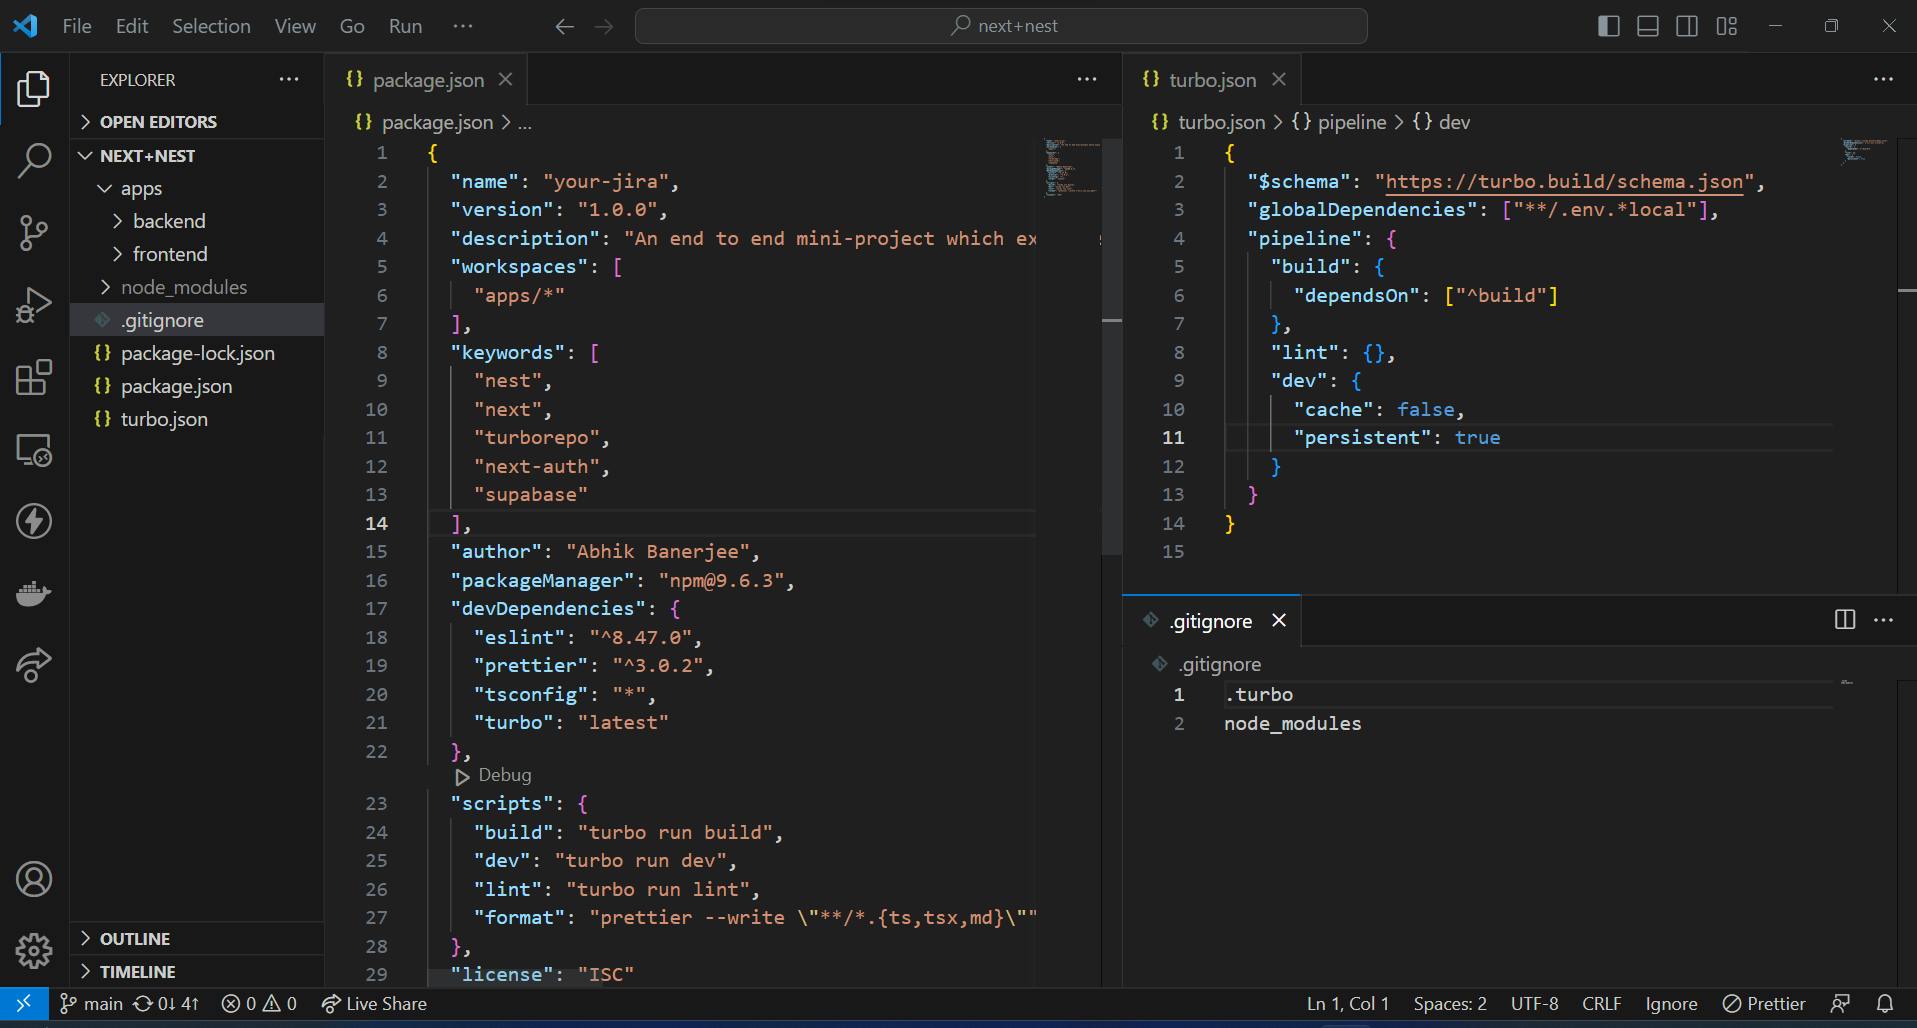
Create a folder called apps and move the backend and frontend folders inside it. The apps folder is our workspace. The complete package.json will look something similar to the script below.
{
  "name": "your-jira",
  "version": "1.0.0",
  "description": "An end to end mini-project which explores using NextJs, Next Auth on the frontend and NestJs backend by making a lightweight Kanban board called \\\"Your Jira\\\".",
  "workspaces": [
    "apps/*"
  ],
  "keywords": [
    "nest",
    "next",
    "turborepo",
    "next-auth",
    "supabase"
  ],
  "author": "Abhik Banerjee",
  "packageManager": "npm@9.6.3",
  "devDependencies": {
    "eslint": "^8.47.0",
    "prettier": "^3.0.2",
    "tsconfig": "*",
    "turbo": "latest"
  },
  "scripts": {
    "build": "turbo run build",
    "dev": "turbo run dev",
    "lint": "turbo run lint",
    "format": "prettier --write \"**/*.{ts,tsx,md}\""
  },
  "license": "ISC"
}
Next, we need to create a Turbo script. This is done by creating a turbo.json file. This file contains the build, lint, test, and dev instructions. A simple turbo.json file might look like the script below. You may copy the turbo.json file below. The pipeline property is where we specify the instructions for build, lint, and test tasks. It also contains the instructions for running the project in Dev mode. In our case, we tell Turbo to not cache anything and every time something changes, rerun the script and refresh.
{
  "$schema": "https://turbo.build/schema.json",
  "globalDependencies": ["**/.env.*local"],
  "pipeline": {
    "build": {
      "dependsOn": ["^build"]
    },
    "lint": {},
    "dev": {
      "cache": false,
      "persistent": true
    }
  }
}
After all these steps, you may lastly add a .gitignore file. You can run npm i to install your dependencies globally. Following this, running npm run dev will start the dev server for both your backend and frontend simultaneously. Your directory structure should look something similar to the image given below.
Note: Normally, you’d have just one root
tsconfig.jsonand have the individual apps inherit from this by theextendskeyword. But I am choosing to be liberal here. So, we are going to have two separatetsconfig.jsonin this project for now. You may change that if you want.
Adding Next Auth and Supabase to Next
Now we move on to the first part of the integration. In this section, we will integrate Supabase with NextJS and use Next Auth for Authentication. You might be thinking “Well, where does NestJs fit into all of this?”. It doesn’t. All will be cleared as we go.
Adding Environment Variables to NextJs
Normally, you’d do something like just add a .env file and be done with it. But that’s not how we do things. If you have been following my previous articles, you’d know by now a better way to add Environment variables to Next.
First, head over to the root of the NextJS project. In our case, that is the root of the frontend folder (not the app folder mind you!). Next, create a file called additional-env.d.ts. This is where we will define the types of our environment variables. In our case, the file would look something similar to the Code file given below. The code file below contains all the env variables needed for this part of things.
declare global {
  namespace NodeJS {
    interface ProcessEnv {
      NODE_ENV: "development" | "production";
      NEXTAUTH_SECRET: string; //Session Secret
      APP_JWT_SECRET: string; //Authorization Token secret
      NEXTAUTH_URL: string;

      GOOGLE_CLIENT_ID: string;
      GOOGLE_CLIENT_SECRET: string;

      NEXT_PUBLIC_SUPABASE_URL: string;
      SUPABASE_SERVICE_ROLE_KEY: string;
    }
  }
}

// If this file has no import/export statements (i.e. is a script)
// convert it into a module by adding an empty export statement.
export {};
Add this file to be picked up by the TS server in this project. To do this, head over to the tsconfig.json of the frontend app, and in the include array add the name of this file. Lastly, create an .env at the same level and add the variable names to it.
The values for NEXT_PUBLIC_SUPABASE_URL and SUPABASE_SERVICE_ROLE_KEY can be obtained from the Supabase Settings. Head over to the API section in settings as shown in the Supabase section above and you will the respective values in the “Project URL” and “Project API Keys” sections as shown below.
The remaining values will be discussed below.
Google Client Credentials
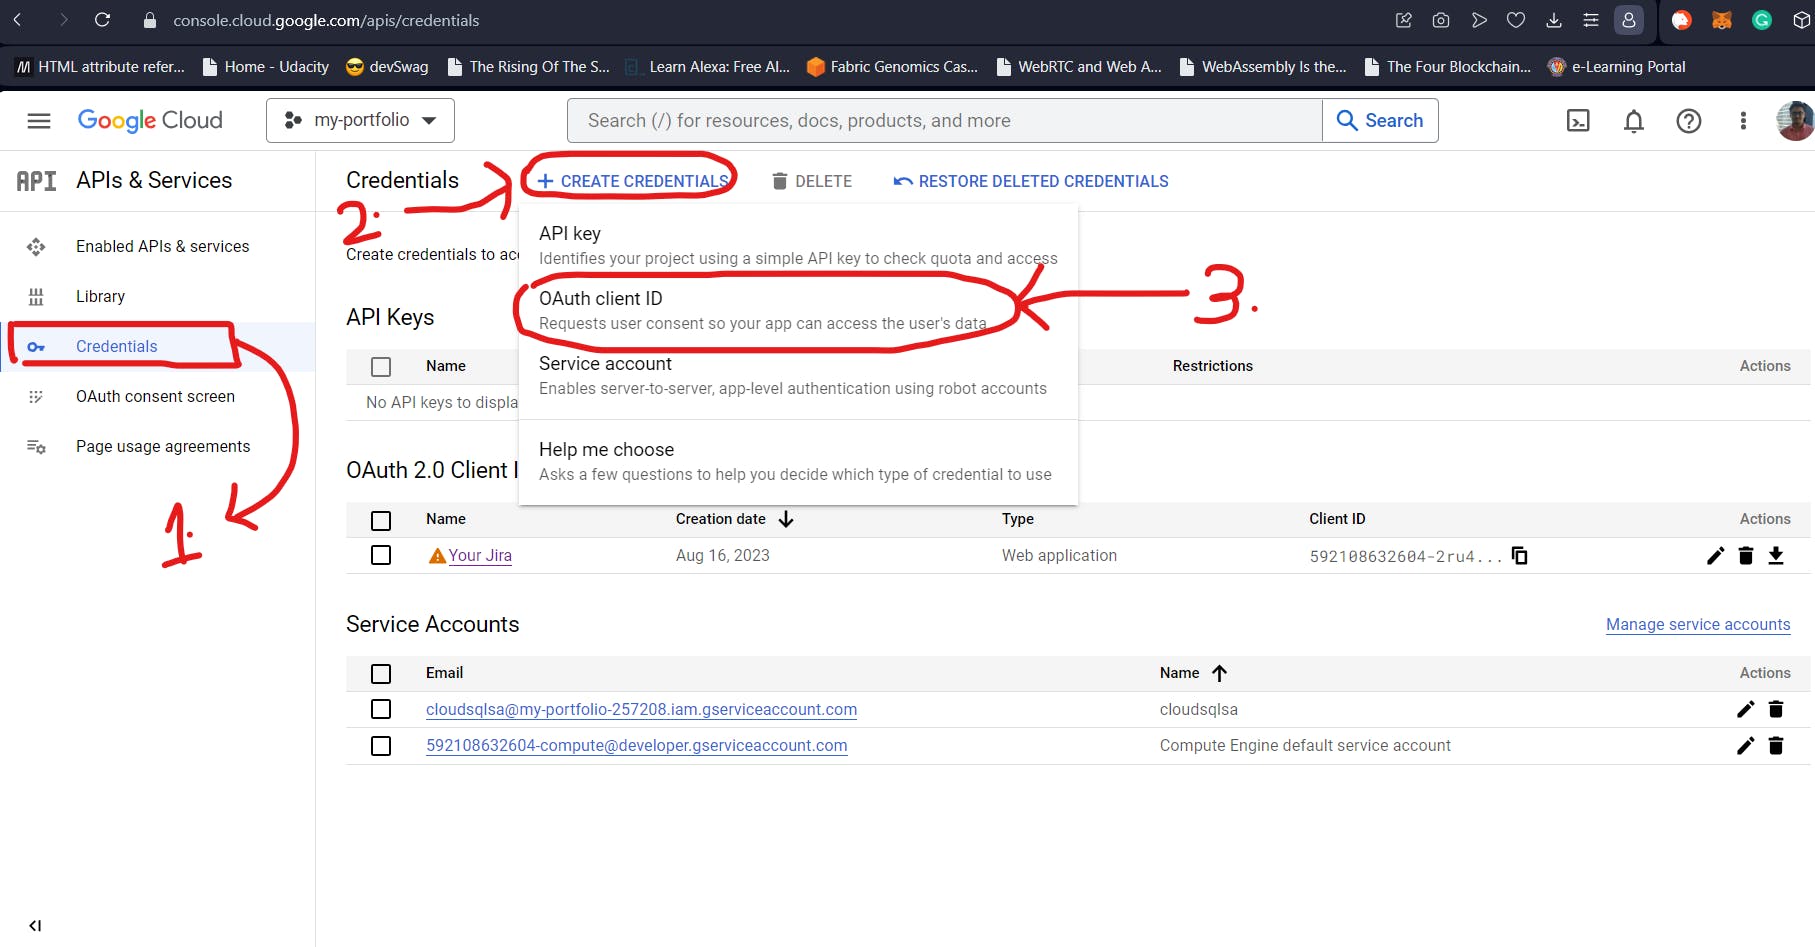
For using Google Sign-in, we will need Google API keys. These API keys will be used by the GoogleProvider of Next Auth. For these values, head over to the Credentials section of “API & Services” as shown below (1.). After this, click on Create Credentials as shown below. Then select ”OAuth client ID”.
In the next screen, you will need to select the ” Application Type” as “Web Application” (1.). This will prompt you for a name for the App (2.). In our case, I have named it “Your Jira” (pretty presumptuous). The ”Authorized Javascript Origins” records the URLs from where the OAuth requests can originate. In our mini-project, the Sign-in requests can independently originate from the frontend and backend (running on localhost:3000 and localhost:3001 respectively). So, we will need to add them both.
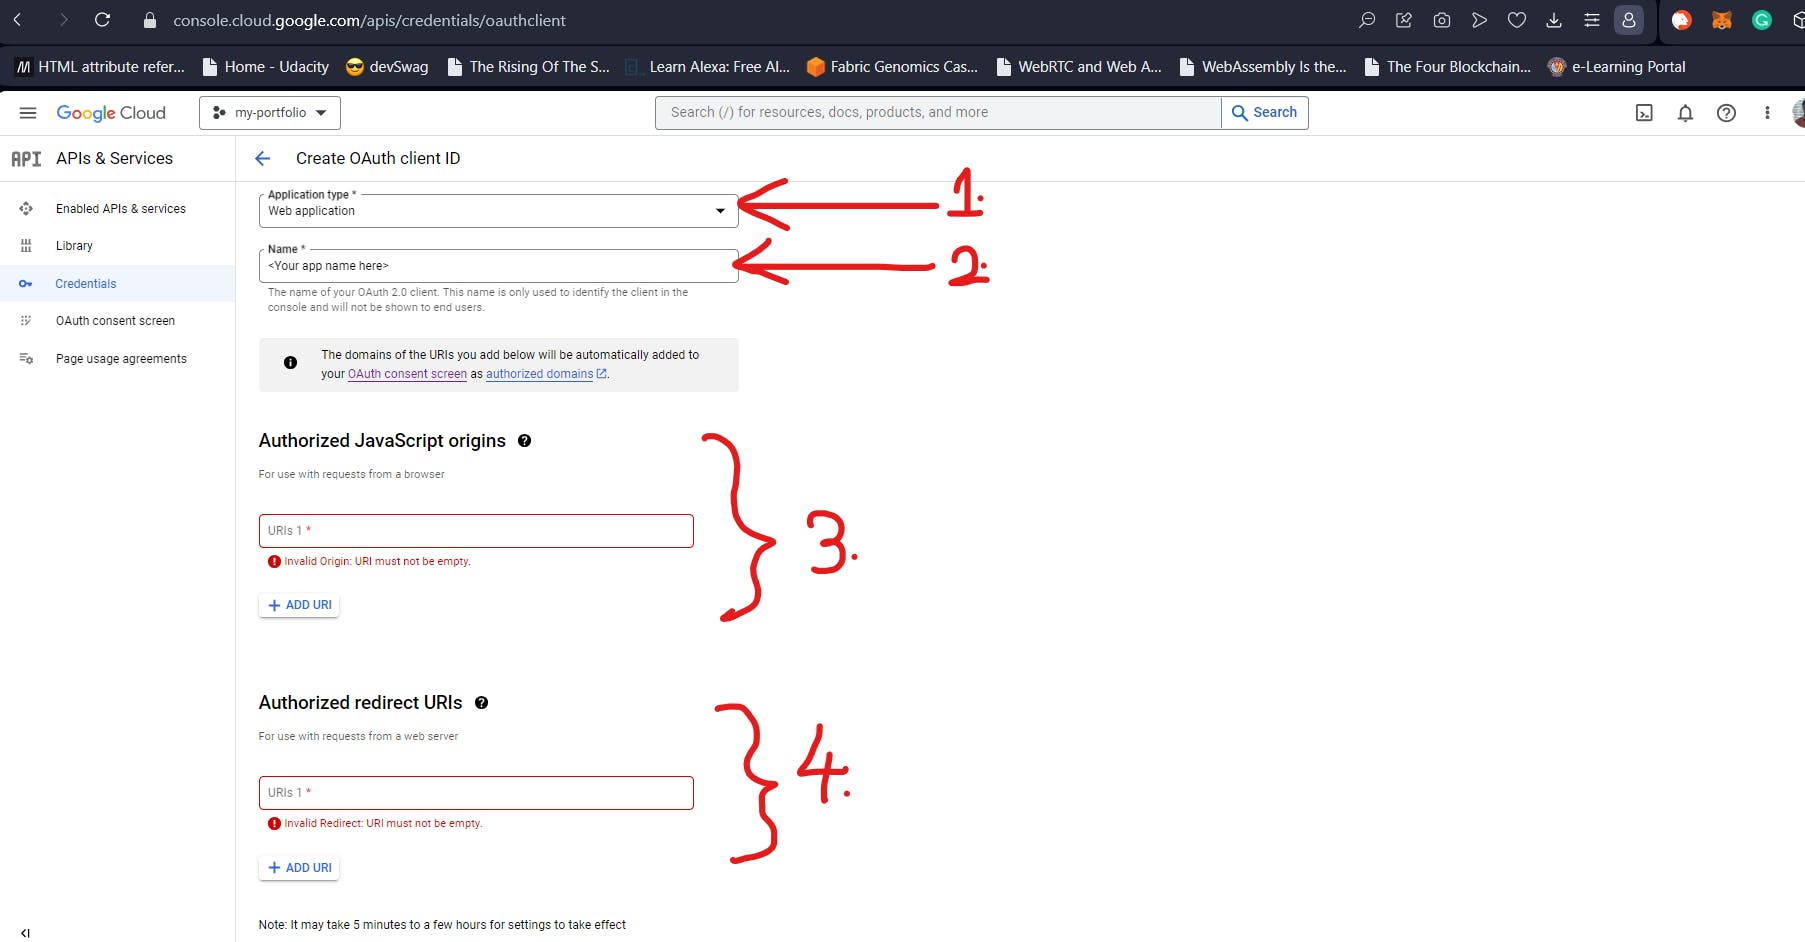
”Authorized redirect URIs” represent the locations where the user will be redirected to after the user selects which Google account to sign in from. Again, this will need to be 2 URIs – one for frontend and another for backend. Clicking on Create will create the OAuth Client and give you the client IDs as shown below. In the image below, you will see 2 client secrets. That’s because I have purposefully generated two different client secrets. But you can work with just one. This will be the GOOGLE_CLIENT_SECRET.
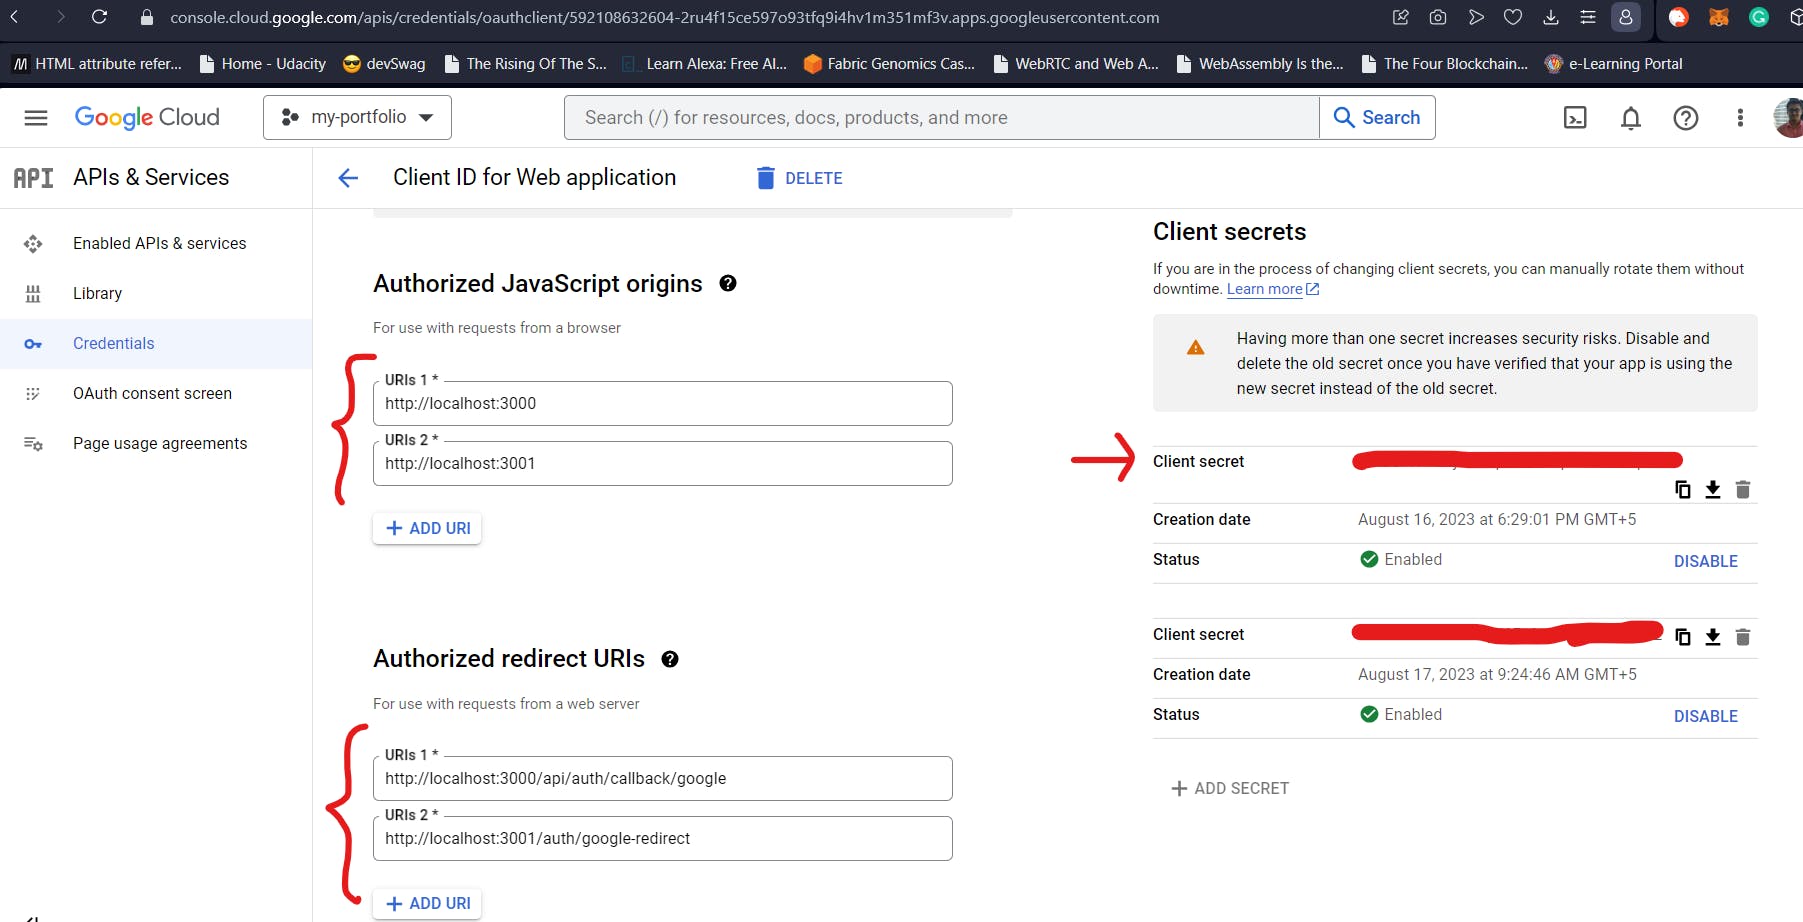
You will get the client ID in the first screen in this subsection after you create your OAuth. This will serve as the value for our GOOGLE_CLIENT_ID. With this, we have the Google bit of things with us.
Integrating Next Auth
All this time, it has been just setup and setup. And now, more so 😊
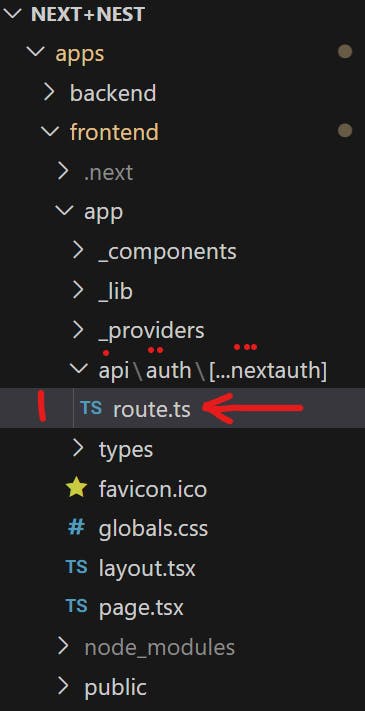
To get started with integrating Next Auth into our Next JS app, head over to the frontend repo. Create a folder called api. Inside this, create another folder called auth. Finally, create a folder called […nextauth] (the name is really important here). Inside this folder, create a file called route.ts. The directory structure should look something similar to the image shown below (do not pay attention to other folders starting with _, we will get to them).
Basically, we are defining a backend API route /auth which Next Auth will handle. The route controllers are defined inside the route.ts file and will look something similar to the code below. In the code below, we build the core of the NextJS Authentication system.
In line 7 below, we start to define our Next Auth handler. Inside the providers array is where we keep all our authentication providers. This shouldn’t be anything new if you have been following my past articles. The difference here is that instead of using CredentialsProvider as we have up till now, we are now using the GoogleProvider. Inside the GoogleProvider constructor, it’s mostly the default options. We are passing in our GOOGLE_CLIENT_ID and GOOGLE_CLIENT_SECRET which we obtained from the section above. We also tell the provider that we want a prompt for consent of the user everytime and we want the offline mode of authentication. This will make sure that we get a refresh_token.
import { signJwt } from "@/app/_lib/jwt";
import { SupabaseAdapter } from "@auth/supabase-adapter";
import { Adapter } from "next-auth/adapters";
import NextAuth from "next-auth/next";
import GoogleProvider from "next-auth/providers/google";

const handler = NextAuth({
  providers: [
    GoogleProvider({
      clientId: process.env.GOOGLE_CLIENT_ID,
      clientSecret: process.env.GOOGLE_CLIENT_SECRET,
      authorization: {
        params: {
          prompt: "consent",
          access_type: "offline",
          response_type: "code",
        },
      },
    }),
  ],
  session: {
    strategy: "jwt",
  },
  adapter: SupabaseAdapter({
    url: process.env.NEXT_PUBLIC_SUPABASE_URL,
    secret: process.env.SUPABASE_SERVICE_ROLE_KEY,
  }) as Adapter,
  callbacks: {
    async jwt({ token, account }) {
      if (account) {
        token.auth_token = await signJwt({
          sub: token.sub,
          id_token: account.id_token,
          access_token: account.access_token,
          expires_at: account.expires_at,
        });
      }
      return token;
    },
    async session({ session, token }) {
      session.auth_token = token.auth_token as string;
      return session;
    },
  },
});

export { handler as GET, handler as POST };
Now, we need to explicitly set strategy to JWT here. Because we are using a DB in the form of Supabase, Next Auth will by default use the session strategy. But in our mini-project, we are going to use JWTs. We set the Supabase Adapter options at line 24. Mostly default options here.
PS: If you haven’t already, run
npm i @auth/supabase-adapter.
The callbacks part is crucial. Normally, Next Auth and NextJS work seamlessly to manage sessions. This also includes encryption and decryption of session JWTs. But we want to use another custom JWT. This is where the jwt() callback comes in. This callback is invoked whenever JWT creation or updation is needed. Since we are using the jwt strategy, this callback will be invoked time and again. This callback receives the decrypted Next Auth JWT token. During Sign-in, this callback also receives another parameter called account which contains the details sent back by the provider.
In our case, GoogleProvider will send back the id_token, access_token and expires_at which we will use to create our own custom JWT token using the signJwt() method. This custom, encrypted JWT will be attached to the token through the auth_token property.
The Next Auth Token comes from the jwt() callback to the session() callback. In the session() callback, we will once again need to add the auth_token property taken from token into the session object. This will make sure that whenever we access the session on the frontend after sign in, we get the custom JWT token. This is how we should customize Next Auth when using it with third-party providers like GitlabProvider, GithubProvider and in our case, GoogleProvider.
This custom JWT token will be used as an authorization token. Basically, this authZ token is our way of interacting with the NestJs backend while the access_token and id_token acts as the authN token and tells us we are interacting with a valid Google User. The code below is what we keep inside a separate jwt folder inside the _lib folder.
import jwt from "jsonwebtoken";

export const signJwt = async (payload: any, expiresIn = "1d") => {
  const token = await jwt.sign(payload, process.env.APP_JWT_SECRET, {
    algorithm: "HS512",
    expiresIn,
  });
  return token;
};

export const verifyJwt = (token: string) => {
  const data = jwt.verify(token, process.env.APP_JWT_SECRET, {
    algorithms: ["HS512"],
  });
  return data
};
As you can see, the above code is just a wrapper around JWT creation. The APP_JWT_SECRET serves as the secret key for our custom JWT. This secret needs to match the JWT secret on the Nest backend end for the whole thing to seamlessly work.
Lastly, create a types folder, and inside it, create a next-auth.d.ts file. Paste the following code inside it. This piece of code tells Next Auth that in addition to whatever Next Auth is sending inside the session of a signed-in user, we want to include our custom property called auth_token (which will hold our authZ JWT token).
import NextAuth from "next-auth"

declare module "next-auth" {
  interface Session extends Session {
    auth_token: string;
  }
}
With this, we have fully integrated Next Auth with Google OAuth Provider into our NextJS project and customized it to interact with a custom NestJS backend.
Adding an AuthContext, Appbar and Sign In button
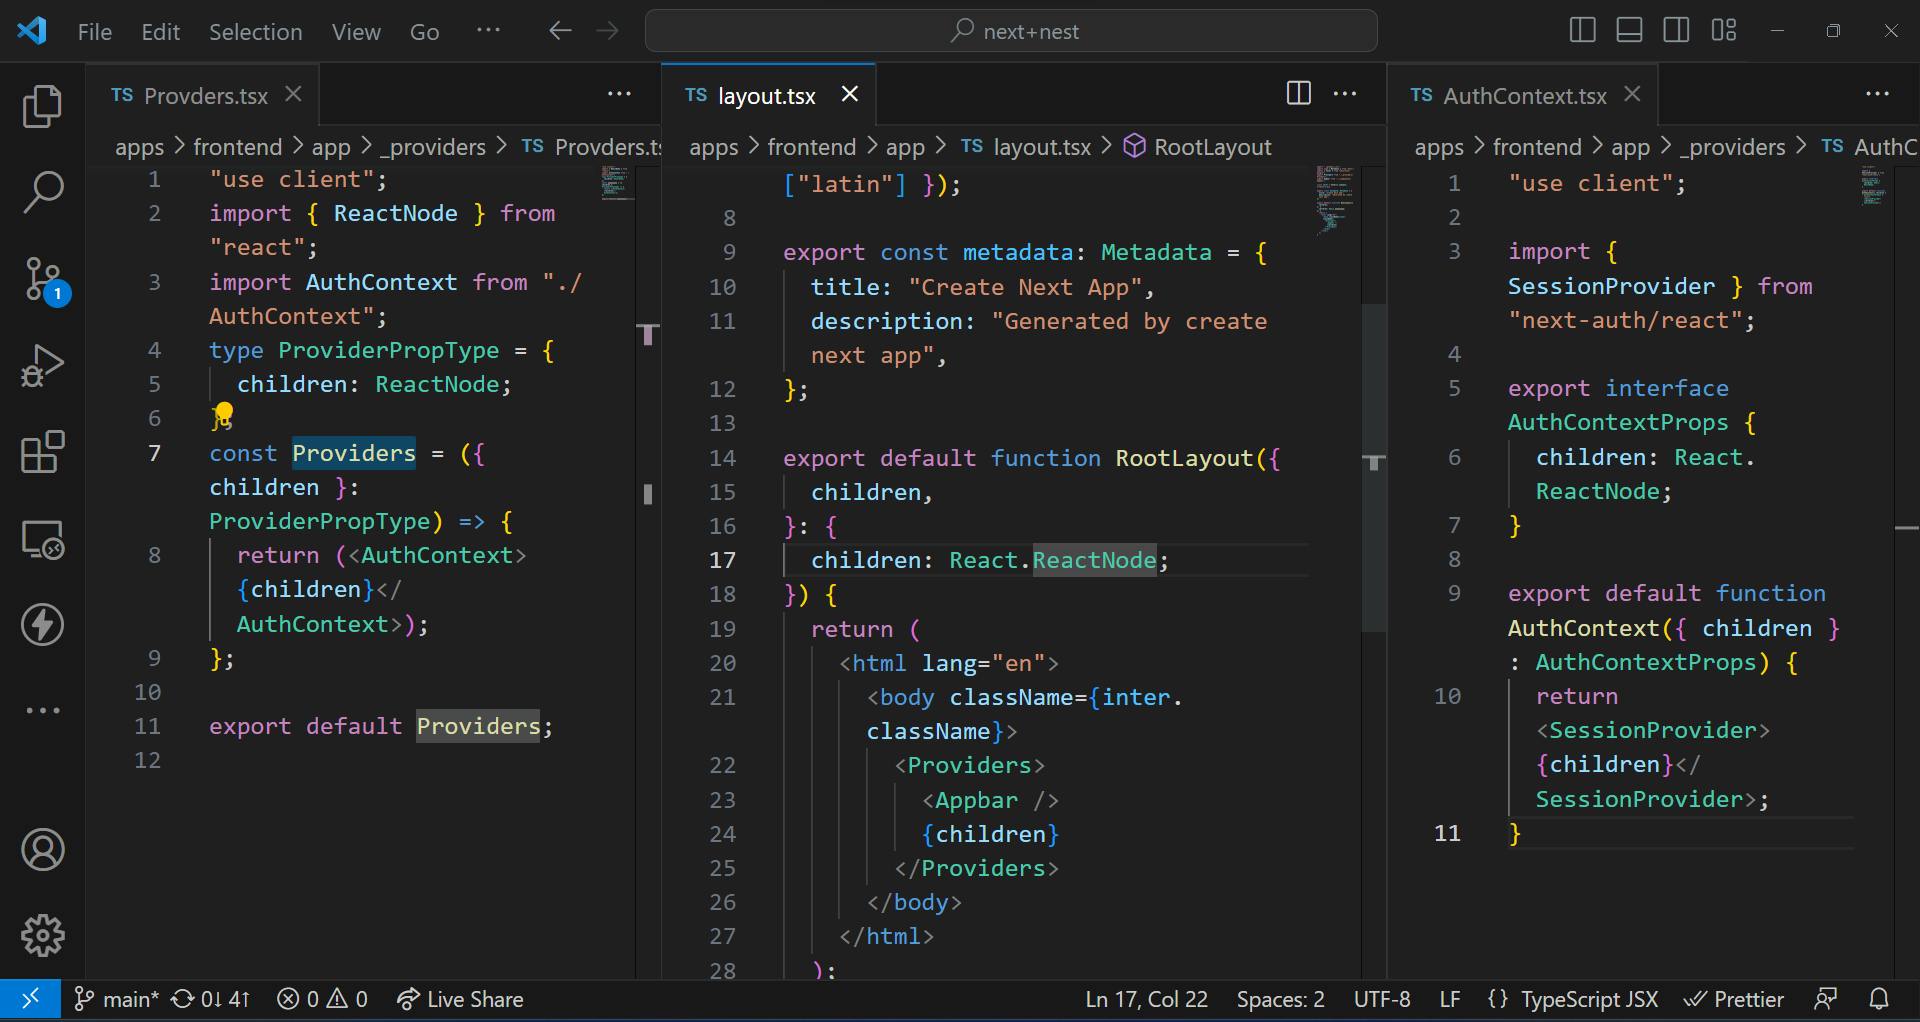
Firstly, to use Next Auth client side, we need to wrap our app in a Context. Luckily, Next Auth provides us with that out of the box. We will follow the convention we have been using thus far in my articles and create a _providers folder which will contain all the providers (keep in mind the files inside this folder will have .tsx extension since they will be used on the frontend side). The Root provider will then be wrapped around the root layout (layout.tsx file at the root of the app folder inside frontend). The image below shows the intended code.
Next, create a _components folder and create a SignoutButton.tsx component. We will make this a client component. It will handle the authentication flow from the client side. Inside the component, we import the useSession() hook from Next Auth as shown below. This hook will provide the session data. The session object (renamed from the data property destructured from the returns of the hook) will contain a user property.
"use client";
import { signIn, signOut, useSession } from "next-auth/react";
import React from "react";

const SignoutButton = () => {
  const { data: session } = useSession();
  if (session?.user) {
    return (
      <div className="flex gap-4 ml-auto">
        <p className="text-sm tracking-tight text-sky-400">
          {session.user.name}
        </p>
        <button onClick={() => signOut()}>Sign Out</button>
      </div>
    );
  }
  return <button onClick={() => signIn()}>Sign in</button>;
};

export default SignoutButton;
This user property will contain the session details. Thanks to all the changes we did in the previous subsection, this user property will contain also the auth_token which can be used to interact with the Nest Backend. The absence of this user property will tell us that the user has not authenticated. We will display “Sign In” if so. Otherwise, we will display “Sign Out”.
NOTE: you have used multiple providers for authN and you would like to customize the Sign In page, then in the
signOut()andsignIn()functions you would need to also provide the ID of the providers. But here we will use the Sign In page provided automatically by Next Auth. So, we do not need to pass anything to these functions.
After this, we need to create a simple Appbar. For this, create a component called Appbar.tsx inside the _components folder. As shown in the code section below, it will be a server component. Since we are not using any hooks or client-side interaction, we can limit the interactivity provided by client components to the SignoutButton component only.
import React from "react";
import SignoutButton from "./SignoutButton";

const Appbar = () => {
  return (
    <header className="flex justify-end gap-4 p-4 bg-gradient-to-b from-blue-900 to-black shadow">
      <SignoutButton />
    </header>
  );
};

export default Appbar;
Lastly, add the above Appbar component to the root layout.tsx like done below and that’s it! We have completed our integration of Next Auth and Supabase into NextJS app. In the next section, we will just test out the functionality developed thus far.
import "./globals.css";
import type { Metadata } from "next";
import { Inter } from "next/font/google";
import Providers from "./_providers/Provders";
import Appbar from "./_components/Appbar";

const inter = Inter({ subsets: ["latin"] });

export const metadata: Metadata = {
  title: "Create Next App",
  description: "Generated by create next app",
};

export default function RootLayout({
  children,
}: {
  children: React.ReactNode;
}) {
  return (
    <html lang="en">
      <body className={inter.className}>
        <Providers>
          <Appbar />
          {children}
        </Providers>
      </body>
    </html>
  );
}
Testing out Frontend
The frontend NextJs app will interact with the Supabase instance that we have previously provisioned through Next Auth. Next Auth will use Google OAuth 2.0 through the GoogleProvider and the client credentials we picked up from the Google Cloud Console. To run our apps, just run npm run dev and Turbo will take care of the rest. Our backend and frontend will start parallelly.

If the user signing in is a new user, then a new entry is created in Supabase in the users table. Along with this, another related record is created in the accounts table. The former is for storing your user profiles while the latter stores all the providers that the users in your users table have used to sign in. The real magic of the accounts table becomes clear when using multiple OAuth providers. But here, for the sake of simplicity, we will just use Google OAuth 2.0.
Conclusion
This concludes the first article in the series. While I wanted to complete the integration of Passport and NestJS and show a working demo, I realize that the article has become too long.
For this reason, I will conclude this article here abruptly and in the next article, we will cover the NestJS + Passport + Supabase part and use the auth_token JWT from frontend to interact with the backend.
Until next time, take care and continue to build awesome things!