Password-less login is kind of a misnomer since passwords are involved in one way or another in any authentication step. Even in a biometric system, your biometrics act as a password. The idea of password-less revolves around creating temporary passwords for users. Thereby reducing the attack surface. Rest assured, if the password changes each time, then the attacker will have to get access to the user's email or phone number to crack the system.
This article is a part of series of blogs where we will build the backend and frontend for a password-less authentication system from the ground up. The code used here should not be used as seed code for any project as the project itself is supposed to give an insight into the working of the paradigm.
If you want a more concrete implementation or a module, I would recommend checking out Authboss. It is a complete set of offering for Go devs to integrate secure authentication in their systems.
In this article, we will delve into the design of our system. This article will not be code-intensive and is meant to give you an idea about what we will be building in successive blogs.
Tech Stack
For the backend, we will be using the following:
- Go - to build the backend
- MongoDB - to store the user profile
- Redis - to store OTPs
Simple right? I will not be discussing the frontend stack just yet because I feel conflicted. On one hand, it would be easy and probably niche to build the Frontend stack with React. On the other, I am curious to explore what Rust offers. So let's keep that one in limbo for now.
Design
The system consists of two parts - a sign-up and a sign-in mechanism. We will not be going beyond this in the spirit of keeping things focused. You may try to replicate the stuff and add it to your Todo list app if you want to :)
Sign-up Phase

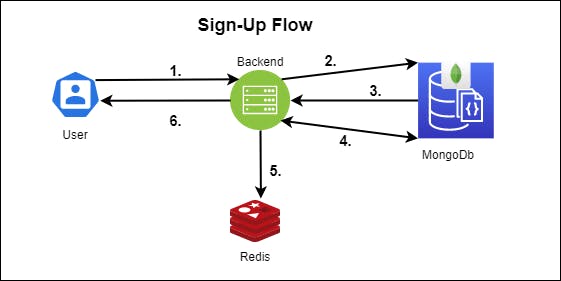
The Sign-up Phase will consist of the following steps:-
- The user pings the backend through the API and sends the user's profile information.
- The backend queries MongoDB to check for the presence of such a profile.
- MongoDB result returns nil since this would be a new user.
- The backend sends the profile to store in MongoDB.
- It stores an OTP for the user's profile verification.
- The backend sends the notification back to the user that an OTP has been sent to the User's email/phone number.
The user then needs to check his/her/it (don't want to offend any bots reading this) and enters the OTP. This completes the Sign-up flow. The user's profile is verified.
Extras
You can take it up a notch and implement the following mechanism:-
- If the user does not verify within X number of hours, then the profile is deleted and the user would need to go again through the flow. This would require a cron job which would periodically run to clear unverified profiles.
- The other possible way to think about the above step would be to store the user's profile in Redis and set an expiry tag. Once the user verifies, move it to MongoDB
Sign-in Phase

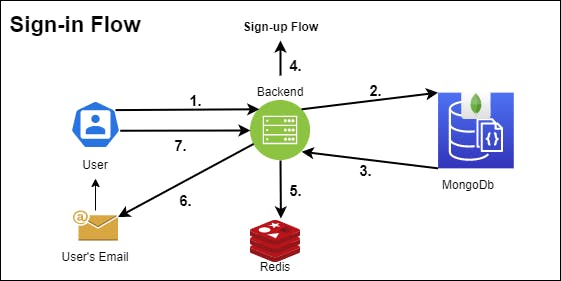
This step would be quite similar to the flow above in representation. The steps, in this case, would be:
- The user pings the backend server API with the email/phone number.
- The backend server checks to find a profile associated with the given email/phone number.
- The MongoDB search either yields a true or a false value.
- If false, the user will need to go through the Sign-up Flow. On the front end, this would mean getting re-directed to the Sign-up page. In case of the backend, this will stop the flow with an error message.
- If the MongoDB search yields a true value, an expiring OTP is generated and stored in Redis.
- The OTP is sent to the user's email/phone with a note that it expires in x seconds/hours.
- The user enters the OTP and is sent back an Authentication Token.
We do not store the Auth token in Redis or MongoDB. The user is responsible for maintaining it. In the case of a full-stack app, this would mean the Auth token might be kept in the browser's cache and attached to every API request.
Additional Flows
Apart from this, we will build the API endpoints for the following:-
- Browse users who have kept their profiles public.
- Change profile details for the current user.
We can go ballistic and implement a friend request setup here. But we will keep that for the future.
Conclusion
Unfortunately, this concludes the current article. All the code for the article series will be made public on GitHub. In the next article, we will design the routes/endpoints and arrange connections for the DB. The article after that will see the implementation of the controllers for those endpoints.
I am taking a break of sorts from my usual blockchain-themed articles and during this time would love to deal out some interesting articles like the ones discussed above. If you liked the article and wish to follow the series, feel free to subscribe to my newsletter and leave a reaction. Until next time, continue to build awesome stuff and WAGMI!
