Testing Your Upgradeable Smart Contract
is different but not difficult...

Writes beginner oriented tech articles and things like that :)
Testing is one of the most important phases of any development process. Smart Contract development is no exception to that. Given that unlike Web2 systems, there is no true “Zero-Hour” fix for issues in Web3, testing assumes paramount importance.
Testing a smart contract can range from Unit testing to Staging test. At the time of writing, tests are mostly written in ChaiJS (because most development is done using Hardhat or Truffle). Foundry offers the options for writing tests in Solidity as explored in one of my previous articles. But it can also go beyond that. In fact, it’s recommended that testing also include vulnerability testing. There is a whole test suite offering a range of tools for that including but not limited to Echidna, Manticore, Mithril.
In this article, however, we will not be focusing on those tools. This article is meant to give you an idea of how you can write tests for upgradeable smart contracts and we will mostly focus on tests in Chai. We won’t be structuring our tests into unit and staging. So, without further ado…
Housekeeping
Before we get into the testing part, please note this article assumes that you have read the previous one in the series. It assumes basic familiarity with Chai testing and that you have knowledge of how a Hardhat project works. There are tons of awesome resources out there on Hardhat and writing smart contract tests using Chai. This article is aimed at helping you understand how to write the tests and not how to organize your tests.
Testing Contract version 1
In the previous article in this series, we went through the first version of the contract. It was pretty simple. There was an initializer function which initialized a public variable meant to hold a greeting. In the code below we deploy the first version of the contract and see to it that that the value of the string variable gets correctly initialized.
const { expect } = require("chai");
const { ethers, upgrades } = require("hardhat");

describe("Contract Version 1 test", function () {
  it("Should return the greeting after deployment", async function () {
    const OurUpgradeableNFT1 = await ethers.getContractFactory("OurUpgradeableNFT1");

    const contract = await upgrades.deployProxy(OurUpgradeableNFT1, ["Hello, upgradeable world!"], { initializer: 'initialize', kind: 'uups'});
    await contract.deployed();

    expect(await contract.greeting()).to.equal("Hello, upgradeable world!");
  });
});
Note that in the above code, we do not go by the traditional deployment method. Instead, after fetching the contract (called OurUpgradeableNFT1), we use the deployProxy method. This comes from the upgrades import above. To import it, you need to first install @openzeppelin/hardhat-upgrades module. Follow the steps below to do that:
- Run
npm i @openzeppelin/hardhat-upgradesto install the module as your dependency. - Import it inside the Hardhat config file in your project root. If you are using Javascript, add the line
require(“@openzeppelin/hardhat-upgrades”)at the top of yourhardhat.config.jsand that’s it really.
In the above code section, note how we pass in the arguments (only 1 in our case) to the initializer as the second argument to deployProxy. The third argument is a JS object that specifies:
- Function which is the initializer function of our contract via
initializerproperty. - The kind of upgradeability we want to use via
kindproperty.
As mentioned in the previous article, we will be going with the latest and arguably the better one – UUPS proxy method. When executed for actual deployment, deployProxy not only deploys the proxy but also the implementation contract which is OurUpgradeableNFT1. Here it returns an object which contains the Proxy and reference to the implementation contract connected to the proxy.
We can use this object as we normally do for smart contract testing. This is because we will be interacting with the proxy in real deployments and this is a great way to test that out. All the function calls will be delegated to the implementation along with the context (data for that function call) and the results will be returned through the proxy. So far so good, right?
Testing Contract Version 2
Next, we dial it up a notch. Now we are going to deploy the second version and test that out. Here we need to deploy the version 1 and then deploy version 2 since the tests below are conducted separately (obvious duh…) from the ones in the previous section. We deploy these contracts (OurUpgradeableNFT1 and OurUpgradeableNFT2) in the beforeEach hook as shown in the code section below.
There two things to note here. First is that through this testing method, we have 2 Javascript objects – one containing the proxy which refers to the old version one contract (in oldContract) and another which contains a proxy that refers to the new implementation i.ee, version 2 (in upgradedContract). Needless to say, this is not possible in a real-deployment.
Another thing to note is that in the code below, when we try to upgrade the proxy, we also pass in the parameter whereby we specify which function to invoke as the initializer in this new contract. This is a handy way to incrementally initialize with successive contract deployments.
const { expect, assert } = require("chai");
const { ethers, upgrades } = require("hardhat");

describe("Contract Version 2 test", function () {
  let oldContract, upgradedContract, owner, addr1;
  beforeEach(async function () {
    [owner, addr1] = await ethers.getSigners(2);
    const OurUpgradeableNFT1 = await ethers.getContractFactory("OurUpgradeableNFT1");
    const OurUpgradeableNFT2 = await ethers.getContractFactory("OurUpgradeableNFT2");

    oldContract = await upgrades.deployProxy(OurUpgradeableNFT1, ["Hello, upgradeable world!"], { initializer: 'initialize', kind: 'uups'});

    await oldContract.deployed();

    upgradedContract = await upgrades.upgradeProxy(oldContract, OurUpgradeableNFT2, {call: {fn: 'reInitialize'}});

  });

  it("Old contract should return old greeting", async function () {
    expect(await oldContract.greeting()).to.equal("Hello, upgradeable world!");
  });

  it("Old contract cannnot mint NFTs", async function () {
    try {
      oldContract.safeMint(owner.address, "Test NFT")
    } catch (error) {
      assert(error.message === "oldContract.safeMint is not a function" )
    }
  })
/*
Remaining Tests Here
*/
The first test checks if the first version is deployed correctly. Additionally, it shouldn’t be able to mint any NFTs because that functionality is getting introduced in the next version. If these two tests pass then we know we are on the right track. Now, the tests below check if the contract was correctly upgraded to the next version. Keep in mind, all versions in upgradeable smart contracts share the same storage space. This means that even in version 2, the greeting variable declared and initialized in version 1 should still exist.
  it("New Contract Should return the old & new greeting and token name after deployment", async function() {
    expect(await upgradedContract.greeting()).to.equal("Hello, upgradeable world!");
    expect(await upgradedContract.greetingNew()).to.equal("New Upgradeable World!");
    expect(await upgradedContract.name()).to.equal("OurUpgradeableNFT")
  });
In the test above, we first invoke to see if the public variable greeting is present in the new contract. If you are new to Hardhat and Ethers, this is how you can call a public variable using – by calling a function with the same name as the name of the public variable. In our case, it should match the previous value of “Hello, upgradeable world!”. In the next line, we test if the greetingNew() function defined in the version 2 of our contract and the name public variable (initialized from the ERC721 contract works or not. If all this test passes, we can be sure that:-
- The upgrade was successful.
- The new contract shares the storage space with the old contract.
Testing Mint functionality in version 2
The last phase is checking if we can now mint NFTs from our upgraded contract. If you have looked through the code of ERC721 contracts from Openzeppelin or are familiar with the EIP, you would know that a contract minting an NFT emits a Transfer event. This transfer takes place from the burn address to the address specified.
  it("Owner can mint NFTs from the upgraded smart contract", async function () {
    await expect(upgradedContract.safeMint(owner.address, "Test NFT"))
    .to.emit(upgradedContract, "Transfer")
    .withArgs(ethers.constants.AddressZero, owner.address, 0);

    expect(await upgradedContract.balanceOf(owner.address)).to.equal(1);
    expect(await upgradedContract.ownerOf(0)).to.equal(owner.address);
  });
In the test above, we check if the Transfer event is emitted from the contract when the safeMint() function is invoked by the owner/deployer address. Ethers library provides ready-to-use constants like the one used above for the 0x0 address. If the upgraded implementation of the contract emits the Transfer event with the parameters specified, we can be sure that mint functionality is present. As an added test, we also check if the balance of the owner increased by 1 after minting.
As per contract design, only the contract owner can mint (thanks to the onlyOwner modifier from OwnableUpgradeable contract). In the test below, we check if any other address (here represented by addr1) can successfully mint or not. If this test fails, then we can be sure that the access control was properly implemented and passed from version 1 to 2.
  it("Only Owner can mint NFTs", async function () {
    await expect(upgradedContract.connect(addr1).safeMint(addr1.address, "Test NFT 2"))
    .to.be.revertedWith("Ownable: caller is not the owner");
  })
If the two tests above pass, then this is a good enough proof of upgradeable contracts working in our case. You can try to add in extra tests for other functionalities as well.
Testing the contract
The article won’t be complete without actually executing these tests covered in the article and to see which one works out. We can easily do that by running npx hardhat test from the terminal. This should yield an output similar to the one below.
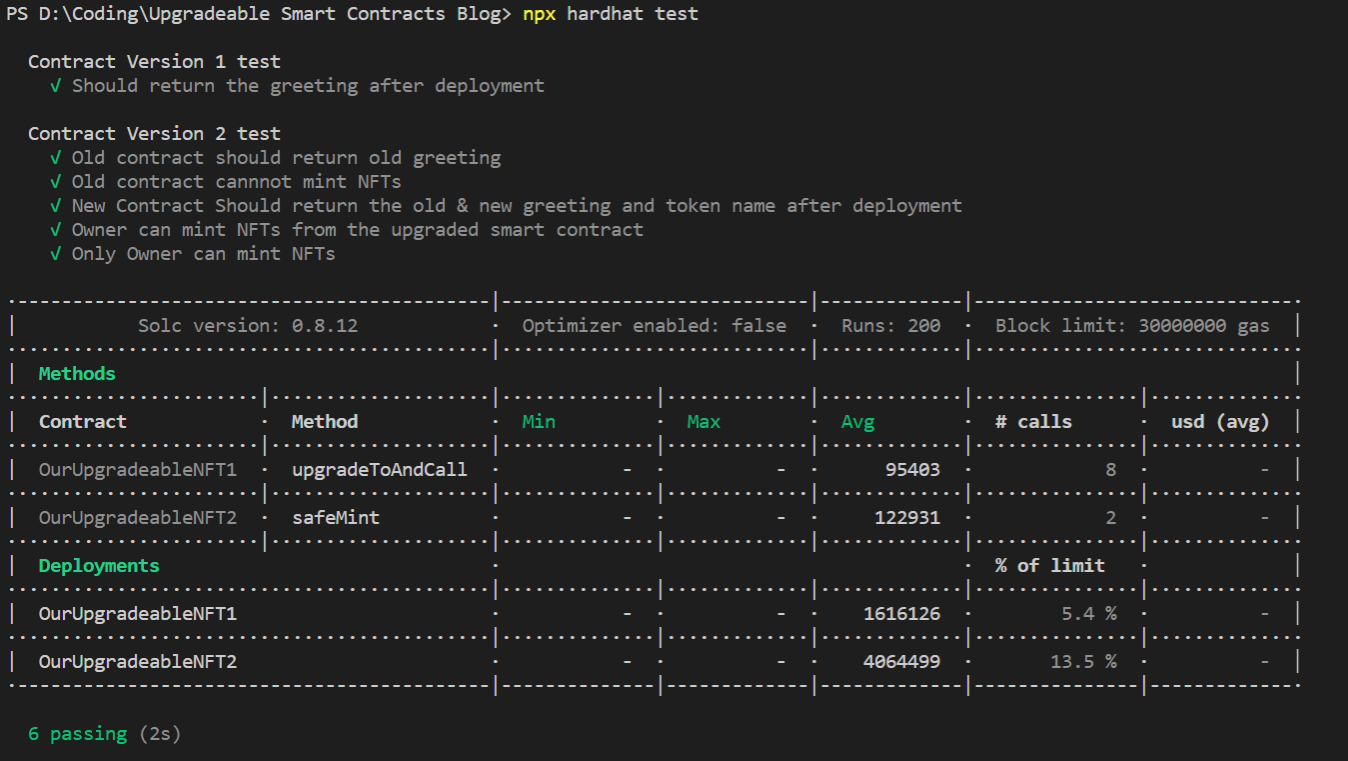
All the tests – contract 1 and contract 2 are executed at once. Hardhat also gives this table where the gas for invoking each function is shown. If you do not get the above table, then you need to enable Hardhat’s Gas reporter via the respectively plugin.
That’s it for this one
This brings us to the end of this article. We covered how upgradeable smart contracts can be tested using simple Chai framework in Hardhat. In the next article of this series, we shall go through the final phase of deployment.
While there is no true “Zero Hour” fix for smart contract vulnerabilities, upgradeable smart contracts offer a compromise. The only way to avoid the unnecessary event is via extensive testing. Writing tests to cover all functionalities is one of the ways to go. Hopefully, this article helped you to learn something in that direction.
If you think I missed out on something, please feel free to comment it or even initiate a discussion below on your views with regards to the topic. Feel free to reach out to me via my social handles or email mentioned in the dev profile. Until the next one, continue to build awesome stuff on Web3 and WAGMI!


