Using Chainlink VRF version 2 in a not-so-special NFT contract
… and deploying it on Polygon using Hardhat.

Writes beginner oriented tech articles and things like that :)
As the title mentions, we will use Chainlink VRF’s version 2 in a smart contract and see how it can be used to add verifiable randomness in a smart contract. While at it, we will create an NFT contract and then deploy it to Mumbai Testnet of Polygon. As a cherry on the top, we will see how to list the minted NFTs from the smart contract on OpenSea. Our NFT images will have no such bounds and can range from your profile picture to a Rare Pokemon or perhaps a mythical devil fruit model but we will not focus on the whole “attaching a metadata.json” part since that’s out of the scope of this article.
This article assumes you are familiar with Alchemy and have a Mumbai Testnet RPC URL for the same or something equivalent to that. Also, you need to have a Polygonscan API key if you want to follow along the verification part. So, for these reasons, feel free browse resources on those topics before you start.
There’s a lot to cover and too few words. So, let’s get on with it.
Chainlink VRF – What and Why?
Chainlink VRF is an offering from Chainlink which provides smart contract a way to introduce randomness into the smart contract. As many readers may be aware of, before VRF, the way to go was using block hash and/or the timestamp or something on those lines to introduce a sense of pseudo randomness.
This was a good first step. But it had a massive apparent flaw. It could be predicted. Because of this, many smart contracts were exploited – especially early-stage games on blockchain which used NFTs or even betting. Since one can effectively time their invocations, they could end up with much higher fortunes. More than being unfair, this caused a dent on the whole ecosystem as Web 3 – something which was supposed to work without trust and be “unexploitable” (at least that’s how it was pitched in the early days) was now not so anymore.
Chainlink took the step to advance the ecosystem further. Sure, enough there were other contenders like Provable (later renamed to Oracalize) but Chainlink VRF outlasted them all and became the go to for introducing off-chain “Verifiable” (hence the name Verifiable Random Function) randomness.
VRF is an oracle which is used for one purpose and one purpose only – getting random number(s). In version 1, smart contract could have queried only 1 random number (uint256) from the oracle. This was altered in the second version where the smart contract could query multiple ones and get an array of uint256 numbers.
The upper limit on the number of random numbers which can be queried at one go is set by the VRF Coordinator Contract on a specific chain. For example, in case of the VRF coordinator contract on Rinkeby, Mumbai and other testnets, the upper limit is 500 at the time of writing.
You may think that this provides a lot of leeway for the developers. But as Uncle Buterin once developed:
“With great data access comes great gas cost”
Chainlink’s documentation details that per uint256 number takes approx. 20k gas. In practice this may vary. And while it might not matter on L2 like Polygon or sidechains and forks like BSC and Avax, in my opinion, it’s a great way to demonstrate responsibility in a gas constrained environment like Eth 1.0.
Moreover, unlike version 1, Chainlink VRF v2 introduces Subscription Manager portal. Basically, you create a subscription here and add funds to it. You get a Subscription ID out of it and that you need to use in your Smart contract as we will see below. Then you add the consumer contract (the address of the contract which will use the Chainlink VRF) and that’s it.
Honestly, the whole flow kind of reminds me of using Chainlink Oracle service to query an API where you need to setFulfillmentPermission().
Creating a Subscription
Before we write the smart contract, we need to create a subscription on the particular chain we want to access Chainlink VRF. This feature on Chainlink VRF is a way to consolidate all smart contracts into one console and is a good step taken in v2 in my opinion.
Head over to the VRF subscription manager portal and click on Create Subscription. This creates a transaction which results in the creation of a subscription. You need to Add Funds in the next step and fund your subscription with LINK tokens.
Once that transaction confirms it will prompt for adding a consumer. This is where we stop for now. You should now have a subscription ID. This will be used by the smart contract so make sure to record it.
Writing the Contract
// SPDX-License-Identifier: MIT
pragma solidity ^0.8.4;

import "@chainlink/contracts/src/v0.8/interfaces/VRFCoordinatorV2Interface.sol";
import "@chainlink/contracts/src/v0.8/VRFConsumerBaseV2.sol";
import "@openzeppelin/contracts/token/ERC721/ERC721.sol";
import "@openzeppelin/contracts/token/ERC721/extensions/ERC721URIStorage.sol";
import "@openzeppelin/contracts/utils/Counters.sol";

contract OurNFTContract is ERC721, ERC721URIStorage, VRFConsumerBaseV2 {
    using Counters for Counters.Counter;
    VRFCoordinatorV2Interface COORDINATOR;


    uint64 subscriptionId;
    address vrfCoordinator = 0x7a1BaC17Ccc5b313516C5E16fb24f7659aA5ebed;
    bytes32 keyHash = 0x4b09e658ed251bcafeebbc69400383d49f344ace09b9576fe248bb02c003fe9f;
    uint32 callbackGasLimit = 200000;
    uint16 requestConfirmations = 3;
    uint32 numWords =  2;

    struct NFTStat {
        bool exists;
        address originalOwner;
        address currentOwner;
        string characterName;
        uint8 power;
        uint8 specialPower;
        uint16 cooldown;
        uint256 rarity;
    }

    mapping(uint256 => string) requestToCharacterName;
    mapping(uint256 => address) requestToSender;

    Counters.Counter private _tokenIdCounter;


    mapping(uint256 => NFTStat) private characterRegistry;

    event ReceivedRandomness( uint256 reqId, uint256 n1, uint256 n2);
    event RequestedRandomness( uint256 reqId, address invoker, string name);

    constructor(uint64 _subscriptionId) ERC721("OurNFTContract", "ONC") VRFConsumerBaseV2(vrfCoordinator) {
        COORDINATOR = VRFCoordinatorV2Interface(vrfCoordinator);
        subscriptionId = _subscriptionId;
    }

...

}
The contract would not be very complex. The twist in it will be in the minting part. We will use Openzeppelin’s ERC721 contract along with the other needed ones from the package and Chainlink’s Contracts. In this example, we will inherit from ERC721, ERC721URIStorage (used for storing the URI of the respective NFT metadata JSON) and VRFConsumerBaseV2 (throwback to how one needs to inherit ChainlinkClient to query any API using Oracle Contract).
In the lines following up to the constructor, we define a few important variables.
COORDINATORis used for using the VRF Coordinator (it’s like when you use the IERC20 interface and pass in the ERC20 contract address to invoke a certain function on that ERC20 contract). Here, theCOORDINATORis used to interact with the Coordinator contract on the Mumbai Testnet.- The
subscriptionId,vrfCoordinator,keyHash,callbackGasLimit,requestConfirmations,numWordsare used for formulating the request we will send to the Coordinator Contract. Most of these can be initialized through the constructor to provide a more dynamic method in contract but we initialize it here to the fixed values. ThesubscriptionIdwill be obtained from Subscription Manager whilevrfCoordinatorandkeyHashwill vary based on chain. The next three can be modified as per needs and will specify the gas limit of the fulfillment function, number of confirmations the coordinator has to wait and the number of words to send back respectively. - The struct
NFTStatis used for tracking the original owner and current owners of the token. Since the NFT will be listed on OpenSea, an immediate function of it would be the ability to sell it. If so, then NFTStat is a handy thing to track the existence, current and original owners, character name, power, special power and cooldown stats.characterRegistrymaps each token minted from this character to its respective stat. requestToCharacterNameandrequestToSenderare handy mappings to have. The minting won’t be instantaneous. When the user invokes thesafeMint()function by providing a character name, the function would send a request to the Coordinator contract. The coordinator contract would send back the requested random words through thefulfillRandomWords()methods. Since we won’t have access to the provided character name and the address of the user (msg.senderwon’t work inside the fulfillment function), we map these to the request ID which is sent to the coordinator and later access that inside thefulfillRandomWords()function._tokenIdCountertracks the ID of the next token to be minted and is used when minting an NFT.- Once
fulfillRandomWords()has completed execution, it will emit out the random words (numbers are called words here) that were received on a particular request ID using theReceivedRandomnessevent.
The constructor receives the subscription ID which we obtain from the subscription manager and initialize the coordinator by passing into VRFCoordinatorV2Interface the vrfCoordinator address. This concludes our initial part.
Next, shown in the safeMint() function below, we pass in the name of the character. This is one of the attributes of our NFT. The safeMint() function returns the request ID which is sent to the Coordinator contract. This can help us keep track of the request from the coordinator contract as well.
contract OurNFTContract is ERC721, ERC721URIStorage, VRFConsumerBaseV2 {

...

 // Assumes the subscription is funded sufficiently.
    function safeMint(string calldata name) public returns(uint256 requestId) {
        // Will revert if subscription is not set and funded.
        requestId = COORDINATOR.requestRandomWords(
        keyHash,
        subscriptionId,
        requestConfirmations,
        callbackGasLimit,
        numWords
        );
        requestToCharacterName[requestId] = name;
        requestToSender[requestId] = msg.sender;
        emit RequestedRandomness(requestId, msg.sender, name);
    }

    function fulfillRandomWords(
        uint256 requestId,
        uint256[] memory randomWords
    ) internal override {
        uint256 w1 = randomWords[0];
        uint256 w2 = randomWords[1];
        uint8 p = uint8(w2 % 10);
        uint8 sp = uint8(w2 % 100 /10);
        uint16 c = uint16(w2 % 1000 / 100);


        address sender = requestToSender[requestId];
        string memory name = requestToCharacterName[requestId];
        uint256 tokenId = _tokenIdCounter.current();
        _tokenIdCounter.increment();
        _safeMint(sender, tokenId);

        characterRegistry[tokenId] = NFTStat(
            true,
            sender,
            sender,
            name,
            p,
            sp,
            c,
            w1 % 10000
        );
        emit ReceivedRandomness(requestId, w1, w2);

    }

...
}
One difference some readers might notice above is the change of requestID from bytes32 to uint256. This is one of the nuances of v2 and in my opinion is a subtle but good step. We receive the requestId from the COORDINATOR in the above function and then use it to map the provided character name and minter address in requestToCharacterName and requestToSender mappings. Lastly, the function emits a RequestedRandomness event.
The fulfillRandomness() function above is invoked by the Coordinator and receives the requestId and randomWords array. The former parameter is the same request ID we obtained from invoking safeMint() and the latter contains the 2 random numbers we requested.
It should be noted here that while you can send the request to Coordinator to get random numbers via VRF in any contract method, the fulfillRandomness method with its current function prototype is a must. Otherwise, you would get the “You need to convert your contract to abstract” notification from compiler. This is because the VRFConsumerBaseV2 we inherited makes it mandatory. The coordinator will invoke this function only when sending back the results from VRF service.
This is why here we conduct the actual mint of the NFT. We take out the two random numbers sent back and then calculate the power, special power and cooldown period from the second random number. The last 4 digits of the first random number are used as rarity.
As you may know that using decimal in solidity is not a luxury we have, so the last 4 digits would get converted to a number having two digits to the right of the decimal point. We retrieve back the address of the minter and the character name provided.
We then increment the tokenIdCounter and then mint an NFT with the tokenId to that address. The characterRegistry records the stats we wish to record for this NFT. Lastly, we emit the ReceivedRandomness event which shows us the two uint256 random numbers we received from the VRF for our particular requestId.
The getCharacter() function below is a utility function that gives us the metadata of our minted NFT. This is to be used by the Metadata Server.
contract OurNFTContract is ERC721, ERC721URIStorage, VRFConsumerBaseV2 {

...

function getCharacter(uint256 tokenId)
    public
    view
    returns (
        address,
        address,
        string memory,
        uint8,
        uint8,
        uint16
    ) {
        require(characterRegistry[tokenId].exists == true, "Character does not Exist.");
        return (
            characterRegistry[tokenId].currentOwner,
            characterRegistry[tokenId].originalOwner,
            characterRegistry[tokenId].characterName,
            characterRegistry[tokenId].power,
            characterRegistry[tokenId].specialPower,
            characterRegistry[tokenId].cooldown
        );
    }

...

}
That’s not all. Remember how we wanted to track the stats of our NFT as it changes hands? It is a safe assumption that any decent smart contract would invoke the safeTransferFrom() but some developers might not want to add the extra safeguard of onERC721Received() by implementing the IERC721Receiver interface in their market place (refer to the NFT marketplace article by me). So, we need to override the transferFrom() function also as shown below.
contract OurNFTContract is ERC721, ERC721URIStorage, VRFConsumerBaseV2 {

...

    function transferFrom(
        address from,
        address to,
        uint256 tokenId
    ) public virtual override {
        super.transferFrom(from, to, tokenId);
        characterRegistry[tokenId].currentOwner = to;
    }

    function safeTransferFrom(
        address from,
        address to,
        uint256 tokenId
    ) public virtual override {
        super.safeTransferFrom(from, to, tokenId, "");
        characterRegistry[tokenId].currentOwner = to;
    }

    function setTokenURI(uint256 tokenId, string memory _tokenURI) public {
        require(
            _isApprovedOrOwner(_msgSender(), tokenId),
            "ERC721: transfer caller is not owner nor approved"
        );
        _setTokenURI(tokenId, _tokenURI);
    }

...

}
We override the transferFrom() and safeTransferFrom() functions in the code above. We do not want to implement our own new custom logic. We just want to record the changing of hands in our characterRegistry so that we can keep track of the current owner and original owner.
This is why we use the super keyword to invoke the transferFrom() and safeTransferFrom() to use the original transfer logic and then add the part which modifies the stats of current owner to the address the NFT is being sent to in the characterRegistry in the respective methods.
Using the virtual keyword in the function prototype allows for further overriding might anyone want to inherit our contract and use it as a base for their contract.
Lastly, we define the setTokenURI and tokenURI functions as shown below. The first function setTokenURI will be used to store the link to the metadata.json file. This file will be generated after the NFT is minted. The tokenURI function will be invoked by OpenSea to get the URL of the metadata.json file. This metadata.json can be hosted on a platform of your choice and can range from your own Google Drive (not recommended) to AWS S3 or GCP storage bucket and the IPFS (preferred).
contract OurNFTContract is ERC721, ERC721URIStorage, VRFConsumerBaseV2 {

...

    function setTokenURI(uint256 tokenId, string memory _tokenURI) public {
        require(
            _isApprovedOrOwner(_msgSender(), tokenId),
            "ERC721: transfer caller is not owner nor approved"
        );
        _setTokenURI(tokenId, _tokenURI);
    }

    function tokenURI(uint256 tokenId)
        public
        view
        override(ERC721, ERC721URIStorage)
        returns (string)
    {
        require( _isApprovedOrOwner(_msgSender(), tokenId),"Not Permitted");
        return super.tokenURI(tokenId);
    }

...

}
This concludes our smart contract writing phase.
Deploying and Verifying on Polygon Mumbai Testnet
Deploying and Verifying parts come easy. If you are on Hardhat (I am using it in this project), you can follow the steps mentioned below
You need to have a Polygonscan API key. Sign up on Polygon Scan and create one. Create a .env file and add the following environment variables as shown below.
POLYGONSCAN_API_KEY=<YOUR API POLYGONSCAN KEY>
MUMBAI_URL=https://polygon-mumbai.g.alchemy.com/v2/<YOUR API POLYGONSCAN KEY>
PRIVATE_KEY=<WALLET PRIVATE KEY HERE>
REPORT_GAS=true
Replace the parts with your respective keys. Next, open the hardhat.config.js file and under networks add the following.
    mumbai: {
      url: process.env.MUMBAI_URL || "",
      accounts: [process.env.PRIVATE_KEY]
    }
If you do not have any networks properties in module.exports then add one like this.
  networks: {
    mumbai: {
      url: process.env.MUMBAI_URL || "",
      accounts: [process.env.PRIVATE_KEY]
    }
  },
Also, you need to add your Polygonscan key to this module.exports under the property of etherscan like this:
  etherscan: {
    // apiKey: process.env.ETHERSCAN_API_KEY,
    apiKey: process.env.POLYGONSCAN_API_KEY,
  },
This should be enough.
Go to the scripts folder in your Hardhat project and then create a file named deploy.js and put the following code in it.
// We require the Hardhat Runtime Environment explicitly here. This is optional
// but useful for running the script in a standalone fashion through `node <script>`.
//
// When running the script with `npx hardhat run <script>` you'll find the Hardhat
// Runtime Environment's members available in the global scope.
const hre = require("hardhat");

async function main() {
  // Hardhat always runs the compile task when running scripts with its command
  // line interface.
  //
  // If this script is run directly using `node` you may want to call compile
  // manually to make sure everything is compiled
  // await hre.run('compile');

  // We get the contract to deploy
  const OurNFTContract = await hre.ethers.getContractFactory("OurNFTContract");
  const ourNftContract = await OurNFTContract.deploy(414);

  await ourNftContract.deployed();

  console.log("Contract deployed to:", ourNftContract.address);
}

// We recommend this pattern to be able to use async/await everywhere
// and properly handle errors.
main().catch((error) => {
  console.error(error);
  process.exitCode = 1;
});
The above is a modified version of the boilerplate code provided when you initialize a hardhat project. On line number 17 we are fetching our contract (named OurNFTContract) using the getContractFactory method from ethers provided by hardhat. In the next line we deploy our contract with OurNFTContract.deploy().
Be sure to replace the 414 with your subscription ID. The deploy method on the smart contract takes the constructor arguments which in our case will be the subscription ID we get from our subscription manager.
Run npx hardhat run scripts/deploy.js –network mumbai to deploy the smart contract. Once deployed, we will get the contract address on our console like this:

After the contract is deployed, run npx hardhat verify –network mumbai <Your Deployed Contract Address> <Subscription ID> to verify your contract. In case it says it’s missing the hardhat-etherscan module just run npm I @nomiclabs/hardhat-etherscan and then re-run the verification command.

You should get an output resembling the image above.
Adding a Consumer
Once you have verified your contract, head back to the VRF Subscription Portal and add in this contract as a Consumer. This is an important step. It basically creates an allowance for your smart contract. So, when safeMint() is invoked and the Coordinator contract is sent a request from our smart contract it won’t fail. It’s a good way to safe guard your subscription as you would have mainnet LINK tokens in your subscription and this would prevent spamming.

As a good practice, if you have a consumer that you no longer use, you should remove it. If anyone unintentionally or intentionally uses invokes Chainlink VRF from that consumer contract, then your LINK balance on the Subscription will be used to fund that request.
Minting an NFT
Since we have deployed and verified our contract at this point, we can just head over to Polygonscan and try to mint an NFT. I have already done so and here are the results.
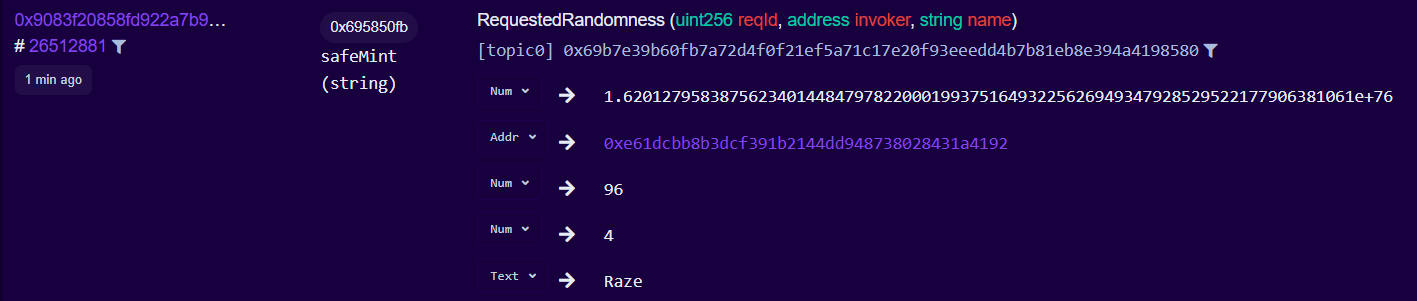 The above image is of the event which was emitted when
 safeMint() function was invoked. As you can see it sent out a request and emitted an event which contained a requestId starting with 16 (its a uint256 integer and hence has been represented in an exponential form), the wallet address of the invoker starting with 0xe61 and the name of the character Raze.
 The above image shows the event emitted from
 fulfillRandomWords() method and contains requestId (which is matching with the image before) and the two uint256 integers returned.
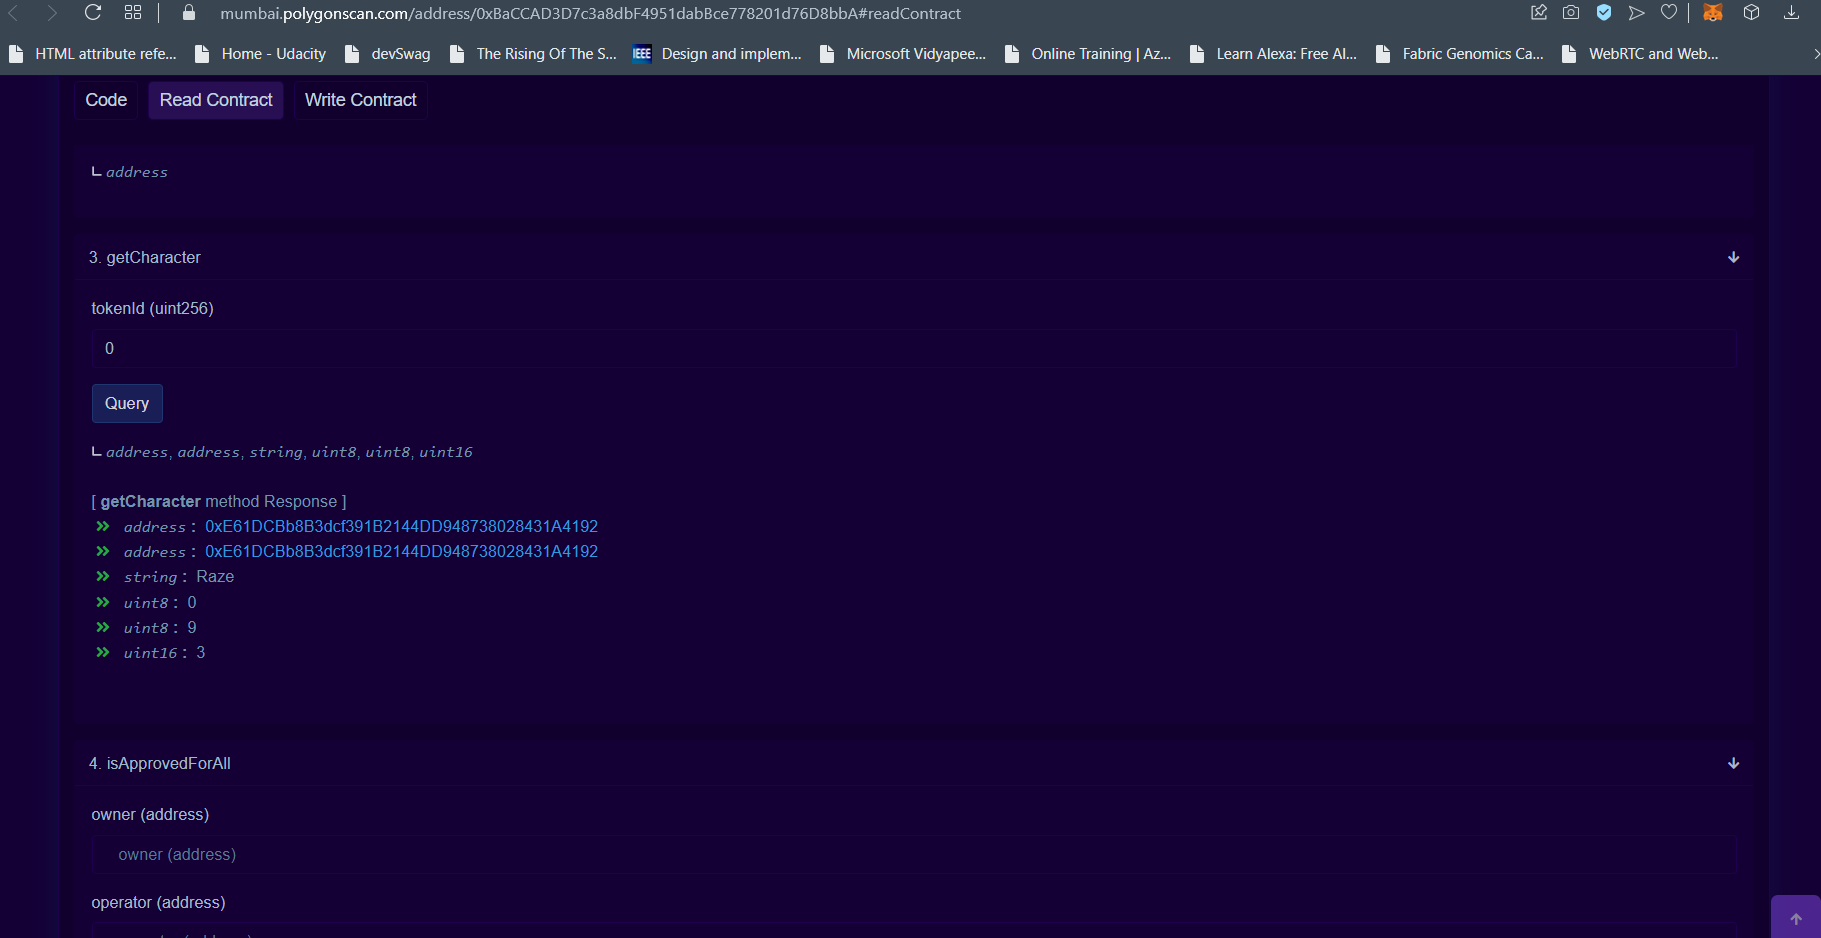 The above image is of the NFT which was minted. The
 getCharacter() method on the contract was invoked which shows the character properties.
Listing on OpenSea
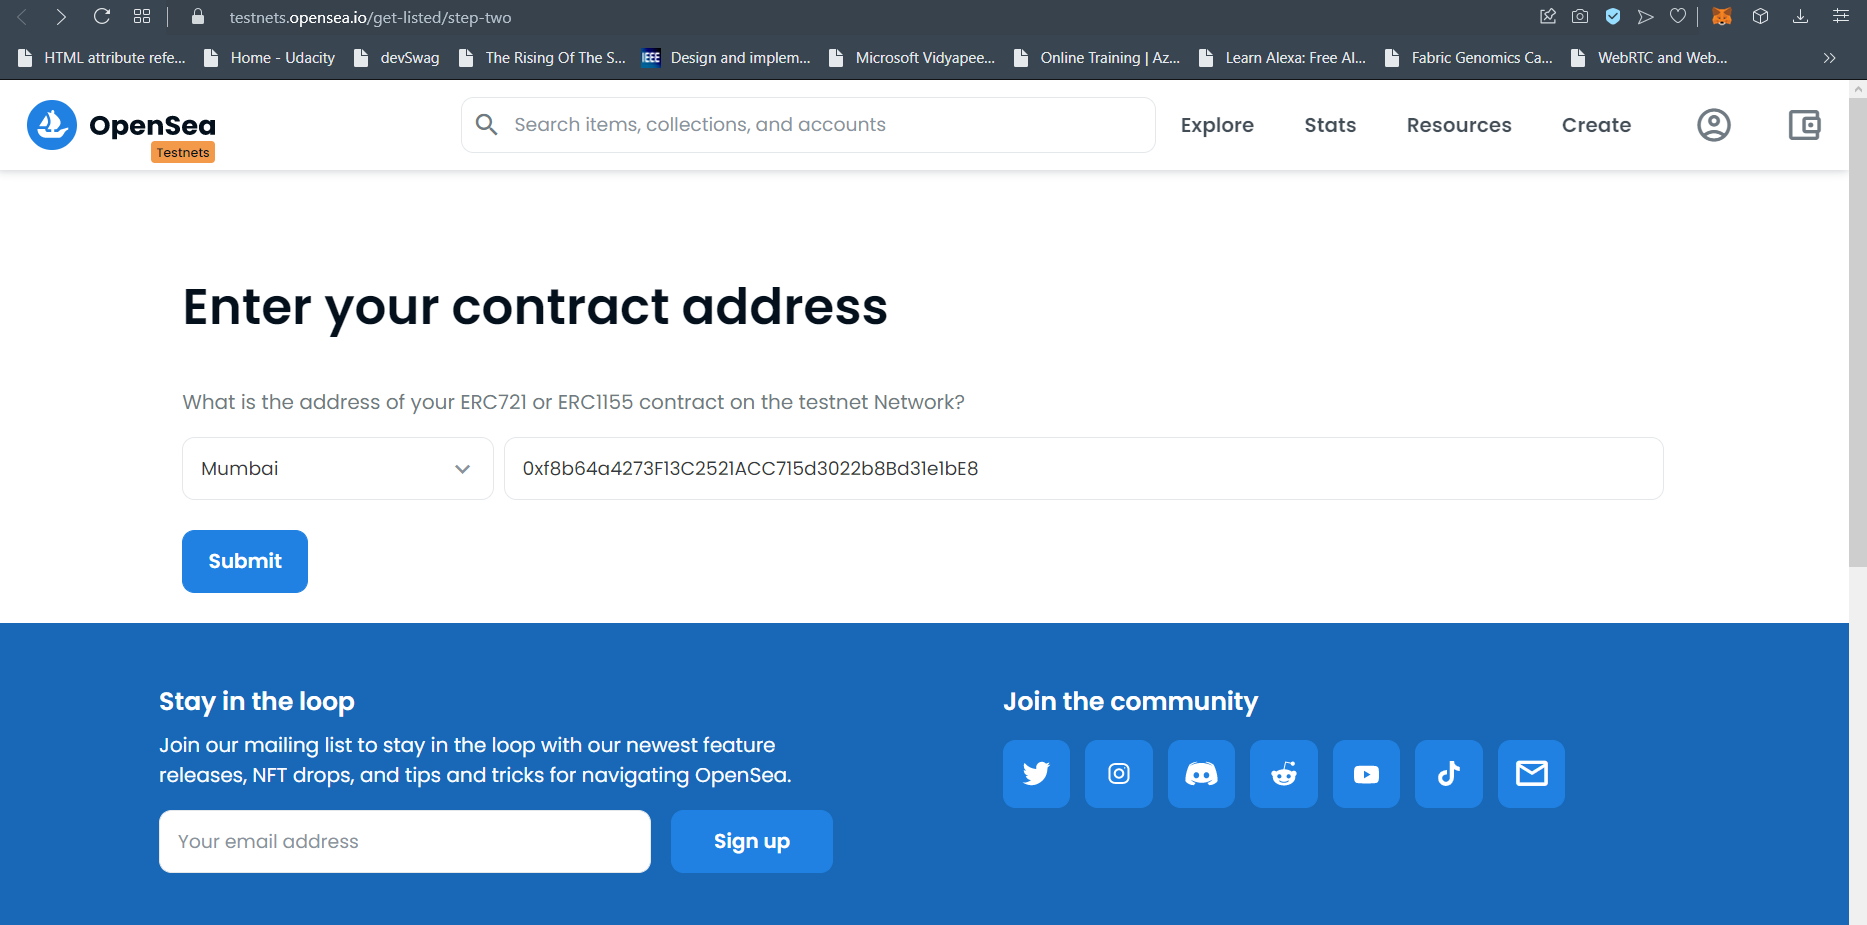
To list the NFT contract on OpenSea, just browse to testnets.opensea.io/get-listed/step-two, select the Mumbai testnet and enter the contract address. Click on submit to list your contract on OpenSea. Any NFTs minted from this contract will show up on OpenSea. It won’t be pretty if you do not attach a metadata.json to your token by setTokenURI after minting it though.
That’s all Folks for this one!
We covered a lot of ground on this one. We discussed briefly Chainlink VRF service. We created a Chainlink VRF subscription via the subscription manager. We wrote a NFT smart contract which used Chainlink VRF v2 to provide random properties to the NFT and then deployed the smart contract on Polygon’s Mumbai Testnet.
The code for this has been open-sourced at the GitHub repo below:
I would have loved to explore how to test such a smart contract using the Mock VRF Coordinator smart contract provided by Chainlink but let’s postpone that to a future article for now. Let’s end this one here.
If you liked the article, please feel free to share and press those lovely buttons which show the love. It helps to keep myself motivated. If you have any topic recommendations, reach out to me on Twitter or through my email. Until then, keep developing awesome stuff on Web3 and WAGMI!


